saltstack-自动化运维工具

saltstack-自动化运维工具

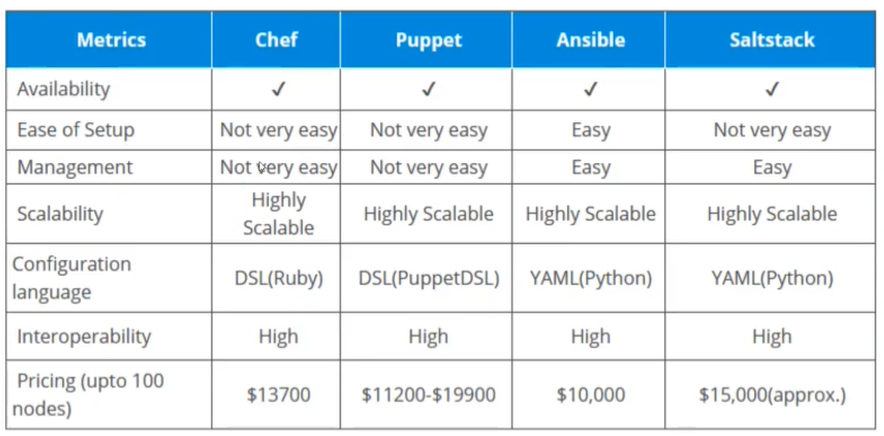
1、四种自动化运维工具

image-20210909101937432

1、salt官网文档

1
https://docs.saltproject.io/en/latest/

2、对比

1
https://www.liquidweb.com/kb/puppet-salt-chef-ansible-a-comparison/

2、salt介绍

1、salt简介

saltstack是由thomas Hatch于2011年创建的一个开源项目,设计初衷是为了实现一个快速的远程执行系统。

SaltStack是一个服务器基础架构集中化管理平台,具备配置管理、远程执行、监控等功能,基于Python语言实现,结合轻量级消息队列(ZeroMQ)与Python第三方模块(Pyzmq、PyCrypto、Pyjinjia2、python-msgpack和PyYAML等)构建。

通过部署SaltStack,我们可以在成千万台服务器上做到批量执行命令,根据不同业务进行配置集中化管理、分发文件、采集服务器数据、操作系统基础及软件包管理等。

2、salt架构

Salt使用服务器-代理通信模型(尽管它作为独立的单服务器管理实用工具工作得很好,而且还提供了在SSH上运行无代理的能力)。服务器组件称为Salt master,代理称为Salt minion. Salt master负责向Salt minions发送命令,然后聚合和显示这些命令的结果。一个salt master可以管理数千个系统。

image-20210909111210692

3、salt的运行方式

a、local 本地运行,交付管理(单台主机的情况,自己管理自己)

b、Master/Minion 常用方式

c、Salt SSH 不需要客户端

3、salt安装

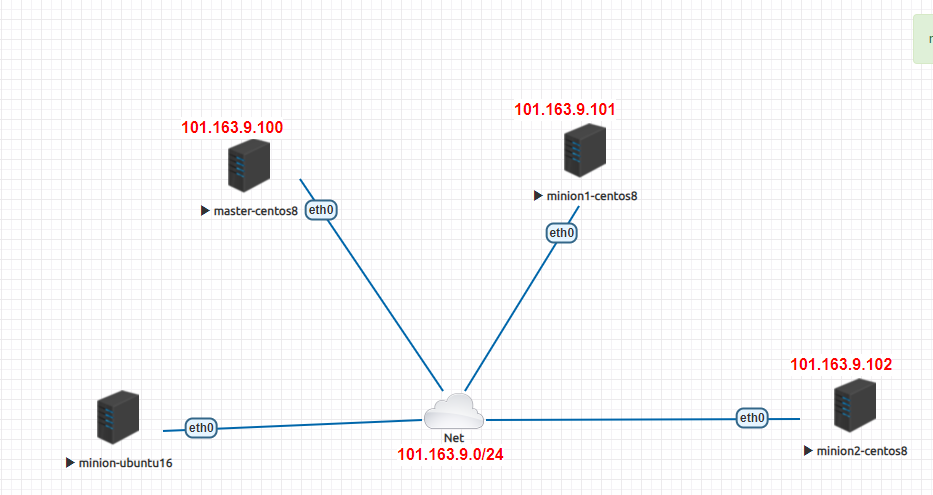
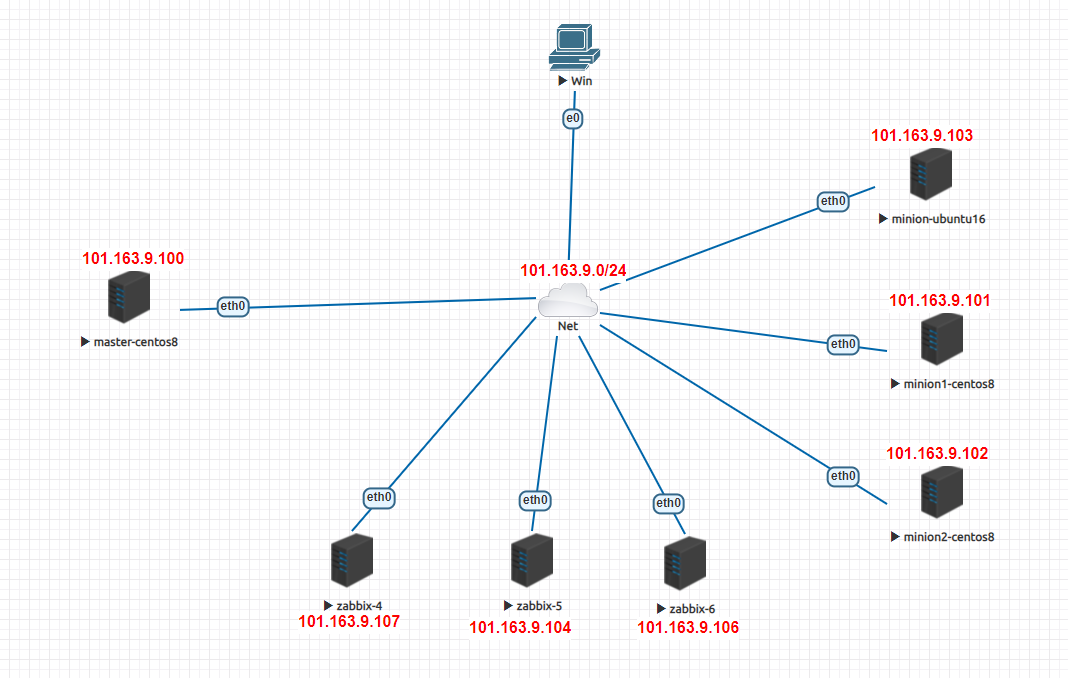
1、拓扑

image-20210909142801700

2、环境准备

1
2
3
4
5
6
7
8
master:101.163.9.100
minion1:101.163.9.101
minion2:101.163.9.102
minion3:101.163.9.103
hostnamectl set-hostname master
hostnamectl set-hostname minion1
hostnamectl set-hostname minion2
hostnamectl set-hostname minion3

3、salt master的安装

1、说明

1
2
#官方仓库网站
https://repo.saltproject.io/

centos7安装salt只需要有epel源就可以,centos8需要使用官网上最新的软件仓库

2、软件仓库准备

1
2
3
4
5
6
7
8
9
10
11
12
13
14
15
16
17
18
19
20
21
22
23
24
25
26
27
#baseos、appstream、epel
#清空旧的软件仓库
rm -rf /etc/yum.repos.d/*

#设置新的软件仓库
cat > /etc/yum.repos.d/a.repo <<END
[BaseOS]
name=baseos
baseurl=https://mirrors.tuna.tsinghua.edu.cn/centos/8/BaseOS/x86_64/os/
gpgcheck=0
enabled=1
[AppStream]
name=AppStream
baseurl=https://mirrors.tuna.tsinghua.edu.cn/centos/8/AppStream/x86_64/os/
gpgcheck=0
enabled=1
[epel]
name=epel
baseurl=https://mirrors.tuna.tsinghua.edu.cn/epel/8/Everything/x86_64/
gpgcheck=0
enabled=1
END

#设置salt的软件仓库
#https://repo.saltproject.io/#rhel
sudo rpm --import https://repo.saltproject.io/py3/redhat/8/x86_64/latest/SALTSTACK-GPG-KEY.pub
curl -fsSL https://repo.saltproject.io/py3/redhat/8/x86_64/latest.repo | sudo tee /etc/yum.repos.d/salt.repo

3、安装saltmaster

1
2
3
4
5
6
7
8
9
10
yum install salt-master -y
sed -i 's/^SELINUX=.*/SELINUX=disabled/g' /etc/selinux/config
setenforce 0
systemctl disable firewalld --now

#启动salt-master服务
[root@master ~]# systemctl enable salt-master --now
[root@master ~]# netstat -tunpl | grep -i python
tcp 0 0 0.0.0.0:4505 0.0.0.0:* LISTEN 27459/python3.6
tcp 0 0 0.0.0.0:4506 0.0.0.0:* LISTEN 27465/python3.6

4、查看salt-key

由于salt的默认方式不是ssh,所以salt关于此套cs架构有专门实现安全通信的密钥

1
2
3
4
5
[root@master ~]# salt-key -L
Accepted Keys:
Denied Keys:
Unaccepted Keys:
Rejected Keys:

4、salt minion的安装

1、设置软件仓库

1
2
3
4
5
6
7
8
9
10
11
12
13
14
15
16
17
18
19
20
21
22
23
24
25
26
27
28
29
30
#centos
#baseos、appstream、epel
#清空旧的软件仓库
rm -rf /etc/yum.repos.d/*

#设置新的软件仓库
cat > /etc/yum.repos.d/a.repo <<END
[BaseOS]
name=baseos
baseurl=https://mirrors.tuna.tsinghua.edu.cn/centos/8/BaseOS/x86_64/os/
gpgcheck=0
enabled=1
[AppStream]
name=AppStream
baseurl=https://mirrors.tuna.tsinghua.edu.cn/centos/8/AppStream/x86_64/os/
gpgcheck=0
enabled=1
[epel]
name=epel
baseurl=https://mirrors.tuna.tsinghua.edu.cn/epel/8/Everything/x86_64/
gpgcheck=0
enabled=1
END

sudo rpm --import https://repo.saltproject.io/py3/redhat/8/x86_64/latest/SALTSTACK-GPG-KEY.pub
curl -fsSL https://repo.saltproject.io/py3/redhat/8/x86_64/latest.repo | sudo tee /etc/yum.repos.d/salt.repo

#ubuntu
sudo curl -fsSL -o /usr/share/keyrings/salt-archive-keyring.gpg https://repo.saltproject.io/py3/ubuntu/20.04/amd64/latest/salt-archive-keyring.gpg
echo "deb [signed-by=/usr/share/keyrings/salt-archive-keyring.gpg arch=amd64] https://repo.saltproject.io/py3/ubuntu/20.04/amd64/latest focal main" | sudo tee /etc/apt/sources.list.d/salt.list

2、centos8安装salt-minion

1
2
3
4
5
6
7
8
9
10
[root@minion1 ~]# yum install salt-minion -y
[root@minion2 ~]# yum install salt-minion -y
sed -i 's/^SELINUX=.*/SELINUX=disabled/g' /etc/selinux/config
setenforce 0
systemctl disable firewalld --now

systemctl enable salt-minion --now

#查看python版本是3.6
[root@minion1 ~]# rpm -ql salt

3、ubuntu16安装salt-minion

1
2
3
4
5
root@minion3:~# apt-get install salt-minion
#默认已启动,selinux组件未装,防火墙默认关闭

#查看使用的python版本是2.7
root@minion3:~# dpkg -L salt-common

5、说明

虽然我们此时已经安装完成了salt master和minion,但是目前master和minion是没有通信的,无通信就意味着CS架构无法实现自动化运维管理

6、salt的安全通信基础

1、salt master和minion通信概述

Salt使用publish-subscribe(发布和订阅的模式)模式与受管系统通信。连接由Salt minion启动,这意味着您不需要打开这些系统上的任何传入端口(从而减少攻击向量), Salt master使用端口4505和4506,必须打开它们才能接受传入连接。

salt不像ssh那样绝对的一对一,发布意味着一对多,订阅意味着一对一

(端口4505)所有的Salt minion都建立一个到publish端口的持久连接,在那里侦听消息。命令被异步地发送到这个端口上的所有连接,这使得命令可以同时在大量系统上执行。

(端口4506)Salt minions根据需要连接到请求服务器,以便将结果发送给Salt master,并安全地请求文件和特定于minions的数据值(称为Salt pillar), salt master和saltminion从之间到这个端口的连接是1:1(不是异步的)。

image-20210909213159765

2、salt minion认证

当minion第一次启动时,它会在网络中搜索名字为salt的系统(尽管可以很容易地将其更改为ip或不同的主机名)。找到后minion启动一个握手,然后将它的公匙发送给salt服务器。因为配置文件里面默认就是把master当做一个名字为salt的节点

1
2
[root@minion1 ~]# tail -f /var/log/salt/minion 
2021-09-09 21:37:59,787 [salt.utils.network:2164][ERROR ][27538] DNS lookup or connection check of 'salt' failed.

在这个初始连接之后, Salt minion的公钥存储在服务器上,并且必须使用Salt-key命令(或通过某种自动化机制)在Salt主服务器上接受它。这可能会让新用户感到困惑,因为在Salt minion的公钥被接受之前, Salt不会提供解码消息所需的安全密钥(这意味着在它的密钥被接受之前, Salt minion不会运行任何命令)。

在接受了minion密钥之后, Salt master返回它的公钥以及一个轮转的AES密钥,该AES密钥用于对Saltmaster发送的消息进行加密和解密。返回的AES密钥使用最初由salt minion从发送的公钥加密,因此只能由该salt minion解密。

4、配置salt-minion和salt-master的通信

1、修改minion的配置指定master

1
2
3
4
5
6
7
8
9
10
11
12
13
14
15
sed -i 's/^#master:.*/master: 101.163.9.100/' /etc/salt/minion

egrep -i '^master:' /etc/salt/minion

systemctl restart salt-minion

#在master上查看key
[root@master ~]# salt-key -L
Accepted Keys:
Denied Keys:
Unaccepted Keys:
gzy-ubuntu
minion1
minion2
Rejected Keys:

2、在配置文件中修改minion id

1
2
3
4
5
6
7
8
sed -i 's/^#id:.*/id: centos8-1/' /etc/salt/minion
systemctl restart salt-minion

sed -i 's/^#id:.*/id: centos8-2/' /etc/salt/minion
systemctl restart salt-minion

sed -i 's/^#id:.*/id: ubuntu16-1/' /etc/salt/minion
systemctl restart salt-minion

5、salt-master上的key操作

1、key的查看

1
2
3
4
5
6
7
8
9
10
11
[root@master ~]# salt-key -L
Accepted Keys:
Denied Keys:
Unaccepted Keys:
centos8-1
centos8-2
gzy-ubuntu
minion1
minion2
ubuntu16-1
Rejected Keys:

2、key的四种定义

Unaccepted Keys:表示未获得salt认可的key

Accepted Keys:表示获得salt认可的key

Denied Keys:表示salt拒绝的key(自动操作产生的结果)

Rejected Keys:salt吊销的key

3、salt-key的目录树

1
2
3
4
5
6
7
8
9
10
11
12
13
14
15
16
17
18
19
[root@master ~]# tree /etc/salt/pki/
/etc/salt/pki/
├── master
│   ├── master.pem
│   ├── master.pub
│   ├── minions
│   ├── minions_autosign
│   ├── minions_denied
│   ├── minions_pre
│   │   ├── centos8-1
│   │   ├── centos8-2
│   │   ├── gzy-ubuntu
│   │   ├── minion1
│   │   ├── minion2
│   │   └── ubuntu16-1
│   └── minions_rejected
└── minion

7 directories, 8 files

4、对比centos8-1和minion1的key

两个key是没有任何区别的,我们之前只是修改了salt-minion的id

1
2
3
4
5
6
7
8
9
10
11
12
13
14
15
16
17
18
19
20
[root@master minions_pre]# cat centos8-1
-----BEGIN PUBLIC KEY-----
MIIBIjANBgkqhkiG9w0BAQEFAAOCAQ8AMIIBCgKCAQEAvTcTH8tQjj0iEzOdTUUq
upW3qyxG+1RbhZJwkuXEqYe2Tj8vyRmZ1fhXZCS65nqwnTZ1rrKwqYANCDDfU/9v
WZFfV3nhnp9ctxmaVbTmMFKe01Tw171LrccgSjw1Dqcns6GWBTe6Pzl8YHAT8dYP
hs6fptky8aOCAp5HuruM6Pn9FQ+TvStxgCFFjpOf7QE9x35eL+6SPWRTwXMU+uUJ
cklMzfrhFKfoBdi7ik9zNwAAsMHlm6gh4ErA15QGYiy16qGl96A8zLAGl4Y4xR5Q
dXbFrZZNKKzvS9u4rCFuEw9jYxY/VJKoU/0UicJu9lZDAAApiGc0+55F/G9JF/y8
cwIDAQAB
-----END PUBLIC KEY-----
[root@master minions_pre]# cat minion1
-----BEGIN PUBLIC KEY-----
MIIBIjANBgkqhkiG9w0BAQEFAAOCAQ8AMIIBCgKCAQEAvTcTH8tQjj0iEzOdTUUq
upW3qyxG+1RbhZJwkuXEqYe2Tj8vyRmZ1fhXZCS65nqwnTZ1rrKwqYANCDDfU/9v
WZFfV3nhnp9ctxmaVbTmMFKe01Tw171LrccgSjw1Dqcns6GWBTe6Pzl8YHAT8dYP
hs6fptky8aOCAp5HuruM6Pn9FQ+TvStxgCFFjpOf7QE9x35eL+6SPWRTwXMU+uUJ
cklMzfrhFKfoBdi7ik9zNwAAsMHlm6gh4ErA15QGYiy16qGl96A8zLAGl4Y4xR5Q
dXbFrZZNKKzvS9u4rCFuEw9jYxY/VJKoU/0UicJu9lZDAAApiGc0+55F/G9JF/y8
cwIDAQAB
-----END PUBLIC KEY-----

5、对key做指纹检查

在master查看centos8-1 key的指纹

1
2
3
[root@master ~]# salt-key -f centos8-1
Unaccepted Keys:
centos8-1: 80:00:6c:1b:8c:f4:07:1b:72:4a:5d:07:66:19:b1:95:64:d1:4a:23:9b:64:c6:29:e8:8b:4b:90:73:00:72:0e

在minion1上查看指纹

1
2
3
[root@minion1 ~]# salt-call --local key.finger
local:
80:00:6c:1b:8c:f4:07:1b:72:4a:5d:07:66:19:b1:95:64:d1:4a:23:9b:64:c6:29:e8:8b:4b:90:73:00:72:0e

6、删除key

1
2
3
4
5
6
salt-key -d minion1 -y
salt-key -d minion2 -y
salt-key -d gzy-ubuntu -y

#删除所有的key
salt-key -D -y

7、key拒绝

-R参数表示拒绝所有的key

1
2
3
4
5
6
7
8
9
10
11
12
13
[root@master ~]# salt-key -r ubuntu16-1 -y
The following keys are going to be rejected:
Unaccepted Keys:
ubuntu16-1
Key for minion ubuntu16-1 rejected.
[root@master ~]# salt-key -L
Accepted Keys:
Denied Keys:
Unaccepted Keys:
centos8-1
centos8-2
Rejected Keys:
ubuntu16-1

当key被拒绝后,minion端伤心了,就自杀了。。

1
2
3
4
5
6
root@minion3:~# systemctl status salt-minion
● salt-minion.service - The Salt Minion
Loaded: loaded (/lib/systemd/system/salt-minion.service; enabled; vendor pres
Active: inactive (dead) since Fri 2021-09-10 09:25:27 EDT; 13h ago
Process: 17819 ExecStart=/usr/bin/salt-minion (code=exited, status=0/SUCCESS)
Main PID: 17819 (code=exited, status=0/SUCCESS)

1、拒绝所有key

1
2
3
4
5
6
7
8
9
10
11
12
13
14
15
16
17
18
19
20
21
22
23
24
25
26
27
28
29
30
31
[root@master ~]# salt-key -R -y
The following keys are going to be rejected:
Unaccepted Keys:
centos8-1
centos8-2
Key for minion centos8-1 rejected.
Key for minion centos8-2 rejected.
[root@master ~]# salt-key -L
Accepted Keys:
Denied Keys:
Unaccepted Keys:
Rejected Keys:
centos8-1
centos8-2
ubuntu16-1
[root@master ~]# tree /etc/salt/pki/
/etc/salt/pki/
├── master
│   ├── master.pem
│   ├── master.pub
│   ├── minions
│   ├── minions_autosign
│   ├── minions_denied
│   ├── minions_pre
│   └── minions_rejected
│   ├── centos8-1
│   ├── centos8-2
│   └── ubuntu16-1
└── minion

7 directories, 5 files

2、恢复拒绝的key

1
2
3
4
5
6
7
8
9
10
11
12
13
14
15
16
17
18
19
20
21
22
23
24
25
26
27
[root@master ~]# rm -rf /etc/salt/pki/master/minions_rejected/*
[root@master ~]#
[root@master ~]# tree /etc/salt//pki/
/etc/salt//pki/
├── master
│   ├── master.pem
│   ├── master.pub
│   ├── minions
│   ├── minions_autosign
│   ├── minions_denied
│   ├── minions_pre
│   └── minions_rejected
└── minion

7 directories, 2 files

#重启salt-minion服务
systemctl restart salt-minion.service

#查看key
[root@master ~]# salt-key -L
Accepted Keys:
Denied Keys:
Unaccepted Keys:
centos8-2
ubuntu16-1
Rejected Keys:

8、接受key

1、参数说明

-a 表示接受单个key

-A 表示接受全部key

2、接受一个key

1
2
3
4
5
6
7
8
9
10
11
12
13
[root@master ~]# salt-key -a centos8-1 -y 
The following keys are going to be accepted:
Unaccepted Keys:
centos8-1
Key for minion centos8-1 accepted.
[root@master ~]# salt-key -L
Accepted Keys:
centos8-1
Denied Keys:
Unaccepted Keys:
centos8-2
ubuntu16-1
Rejected Keys:

3、接受所有key

1
2
3
4
5
6
7
8
9
10
11
12
13
14
15
16
17
18
19
20
21
22
23
24
25
26
27
28
29
30
31
[root@master ~]# salt-key -A -y
The following keys are going to be accepted:
Unaccepted Keys:
centos8-2
ubuntu16-1
Key for minion centos8-2 accepted.
Key for minion ubuntu16-1 accepted.
[root@master ~]# salt-key -L
Accepted Keys:
centos8-1
centos8-2
ubuntu16-1
Denied Keys:
Unaccepted Keys:
Rejected Keys:
[root@master ~]# tree /etc/salt/pki/
/etc/salt/pki/
├── master
│   ├── master.pem
│   ├── master.pub
│   ├── minions
│   │   ├── centos8-1
│   │   ├── centos8-2
│   │   └── ubuntu16-1
│   ├── minions_autosign
│   ├── minions_denied
│   ├── minions_pre
│   └── minions_rejected
└── minion

7 directories, 5 files

4、配置master自动接收minion key

如果配置了master自动接收minion的key,则认为你所在的内网是绝对安全的,生产环境大部分都是手动接受的

1
2
3
4
5
6
7
8
9
10
11
12
13
14
15
16
17
[root@master ~]# egrep '^#auto_accept' /etc/salt/master
#auto_accept: False

[root@master ~]# sed -i 's/^#auto_accept.*/auto_accept: true/' /etc/salt/master
[root@master ~]# egrep '^auto_accept' /etc/salt/master
auto_accept: true

systemctl restart salt-master

[root@master ~]# salt-key -L
Accepted Keys:
centos8-1
centos8-2
ubuntu16-1
Denied Keys:
Unaccepted Keys:
Rejected Keys:

除了自动接受所有的key,还可以配置白名单

1
2
3
[root@master ~]# egrep '^#auto.*file' /etc/salt/master
#autosign_file: /etc/salt/autosign.conf
#autoreject_file: /etc/salt/autoreject.conf

6、salt远程执行测试-adhoc

1、基础的ping测试

1
2
3
4
5
6
7
[root@master ~]# salt '*' test.ping
ubuntu16-1:
True
centos8-1:
True
centos8-2:
True

2、cmd模块run方法测试

1
2
3
4
5
6
7
[root@master ~]# salt "*" cmd.run "pwd"
ubuntu16-1:
/root
centos8-2:
/root
centos8-1:
/root

3、salt的命令结构

在命令行输入的命令都是salt的远程执行模块

1
2
[root@master ~]# salt --help 
Usage: salt [options] '<target>' <function> [arguments]

salt 参数 执行目标 salt模块的函数 远程执行的参数

1
2
3
4
5
6
7
8
9
10
11
12
13
14
15
16
17
[root@master ~]# salt --summary "*" cmd.run 'uname'
ubuntu16-1:
Linux
centos8-1:
Linux
centos8-2:
Linux


-------------------------------------------
Summary
-------------------------------------------
# of minions targeted: 3
# of minions returned: 3
# of minions that did not return: 0
# of minions with errors: 0
-------------------------------------------

4、salt一次性进行多次远程执行测试

1
2
3
4
5
6
7
8
9
10
11
12
13
14
15
16
17
18
19
20
21
22
23
24
25
26
27
28
[root@master ~]# salt centos8-1 cmd.run,test.echo,service.status hostname,hello,firewalld
centos8-1:
----------
cmd.run:
minion1
service.status:
False
test.echo:
hello
[root@master ~]# salt --summary centos8-1 cmd.run,test.echo,service.status hostname,hello,firewalld
centos8-1:
----------
cmd.run:
minion1
service.status:
False
test.echo:
hello


-------------------------------------------
Summary
-------------------------------------------
# of minions targeted: 1
# of minions returned: 1
# of minions that did not return: 0
# of minions with errors: 0
-------------------------------------------

5、使用salt命令列出salt所有的模块

salt模块和ansible模块不一样,ansible的每一个模块对应一个功能;salt模块每一个模块对应的是一个功能集,功能集里面有对应的方法来做不同的功能实现。salt的模块比ansible的模块要大

1
2
3
4
5
6
7
8
9
10
11
12
13
14
15
16
17
18
19
20
21
22
23
24
25
26
27
28
29
30
31
32
33
34
35
36
37
38
39
40
41
42
43
44
45
46
47
48
49
50
51
52
53
54
55
56
57
58
59
60
61
62
63
64
65
66
67
68
69
70
71
72
73
74
75
76
77
78
79
80
81
82
83
84
85
86
87
88
89
90
91
92
93
94
95
96
97
98
99
100
101
102
103
104
105
106
107
108
109
110
111
112
113
114
115
116
117
118
119
120
121
122
123
124
125
126
127
128
129
130
131
132
133
134
135
136
137
138
139
140
141
142
143
144
145
146
147
148
149
150
151
152
153
154
155
156
157
158
159
160
161
162
163
164
165
166
167
168
169
170
171
172
173
174
175
176
177
178
179
180
181
182
[root@master ~]# salt centos8-1 sys.list_modules
centos8-1:
- acl
- aliases
- alternatives
- ansible
- archive
- artifactory
- at
- baredoc
- beacons
- bigip
- btrfs
- buildout
- chroot
- cloud
- cmd
- composer
- config
- consul
- container_resource
- cp
- cron
- cryptdev
- data
- defaults
- devinfo
- devmap
- dig
- disk
- django
- dnsmasq
- dnsutil
- drbd
- environ
- ethtool
- event
- extfs
- file
- firewalld
- freezer
- gem
- genesis
- glassfish
- gnome
- google_chat
- grafana4
- grains
- group
- hashutil
- helm
- highstate_doc
- hosts
- http
- hue
- incron
- ini
- inspector
- introspect
- iosconfig
- ip
- ipset
- iptables
- jboss7
- jboss7_cli
- jinja
- k8s
- kernelpkg
- key
- keyboard
- kmod
- kubeadm
- locale
- locate
- log
- logrotate
- lowpkg
- lvm
- mandrill
- match
- mattermost
- mine
- minion
- modjk
- mount
- msteams
- nagios_rpc
- namecheap_domains
- namecheap_domains_dns
- namecheap_domains_ns
- namecheap_ssl
- namecheap_users
- network
- nexus
- nftables
- nova
- nspawn
- nxos
- nxos_api
- nxos_upgrade
- openscap
- openstack_config
- opsgenie
- out
- pagerduty
- pagerduty_util
- pam
- parallels
- partition
- peeringdb
- pillar
- pip
- pkg
- pkg_resource
- ps
- publish
- pushover
- pyenv
- quota
- raid
- random
- random_org
- rbenv
- rest_sample_utils
- restartcheck
- ret
- rsync
- rvm
- s3
- s6
- salt_proxy
- salt_version
- saltcheck
- saltutil
- schedule
- scsi
- sdb
- seed
- selinux
- serverdensity_device
- service
- shadow
- slack
- slsutil
- smbios
- smtp
- solrcloud
- sqlite3
- ssh
- state
- status
- statuspage
- supervisord
- sys
- sysctl
- sysfs
- syslog_ng
- system
- telegram
- telemetry
- temp
- test
- timezone
- tuned
- udev
- uptime
- user
- vault
- vbox_guest
- virtualenv
- vsphere
- x509
- xfs
- xml
- zabbix
- zenoss

[root@master ~]# salt centos8-1 sys.list_modules | grep -vi centos | wc -l
174

[root@master ~]# salt ubuntu16-1 sys.list_modules | grep -vi ubuntu | wc -l
127

salt和ansible架构不同,尤其是ansible的ssh和salt的CS架构。在salt的minion端,里面才是salt所有的python函数安装的位置,可以使用对应的包管理器去查看安装的python模块

7、列出一个模块下的所有函数

1
2
3
4
5
6
7
8
9
10
11
12
13
14
15
16
17
18
19
20
21
22
23
24
25
26
27
28
29
30
31
32
33
34
[root@master ~]# salt centos8-1 sys.list_functions ip
centos8-1:
- ip.apply_network_settings
- ip.build_interface
- ip.build_network_settings
- ip.build_routes
- ip.down
- ip.get_interface
- ip.get_network_settings
- ip.get_routes
- ip.up

[root@master ~]# salt centos8-1 sys.list_functions sys
centos8-1:
- sys.argspec
- sys.doc
- sys.list_functions
- sys.list_modules
- sys.list_renderers
- sys.list_returner_functions
- sys.list_returners
- sys.list_runner_functions
- sys.list_runners
- sys.list_state_functions
- sys.list_state_modules
- sys.reload_modules
- sys.renderer_doc
- sys.returner_argspec
- sys.returner_doc
- sys.runner_argspec
- sys.runner_doc
- sys.state_argspec
- sys.state_doc
- sys.state_schema

8、列出所有模块的所有函数

1
2
3
4
5
6
#做一个简易的模块参考手册
for i in `salt centos8-1 sys.list_modules | grep -vi centos8 | awk '{print $2}'`
do
echo -e "\033[32m $i模块用法\033[0m" >> salt-function-guide.txt
salt centos8-1 sys.list_functions $i >> salt-function-guide.txt
done

9、列出指定模块的某个函数的用法

1
2
3
4
5
6
7
8
9
10
11
12
13
14
15
16
17
18
19
20
21
22
23
24
25
26
27
28
29
30
31
32
33
34
35
36
37
38
39
40
41
42
43
44
45
46
47
48
49
50
51
52
53
54
55
56
57
58
59
60
[root@master ~]# grep selinux salt-function-guide.txt 
- file.get_selinux_context
- file.set_selinux_context
selinux模块用法
- selinux.fcontext_add_policy
- selinux.fcontext_apply_policy
- selinux.fcontext_delete_policy
- selinux.fcontext_get_policy
- selinux.fcontext_policy_is_applied
- selinux.filetype_id_to_string
- selinux.getconfig
- selinux.getenforce
- selinux.getsebool
- selinux.getsemod
- selinux.install_semod
- selinux.list_sebool
- selinux.list_semod
- selinux.port_add_policy
- selinux.port_delete_policy
- selinux.port_get_policy
- selinux.remove_semod
- selinux.selinux_fs_path
- selinux.setenforce
- selinux.setsebool
- selinux.setsebools
- selinux.setsemod
[root@master ~]# salt centos8-2 sys.doc selinux.setenforce
selinux.setenforce:

Set the SELinux enforcing mode

CLI Example:

salt '*' selinux.setenforce enforcing


[root@master ~]# salt '*' selinux.setenforce enforcing
centos8-1:
Enforcing
centos8-2:
Enforcing
ubuntu16-1:
'selinux' __virtual__ returned False
ERROR: Minions returned with non-zero exit code
[root@master ~]# salt '*' cmd.run 'getenforce'
ubuntu16-1:
/bin/sh: 1: getenforce: not found
centos8-1:
Enforcing
centos8-2:
Enforcing
ERROR: Minions returned with non-zero exit code
[root@master ~]# salt '*' cmd.run 'grep -i "^selinux=" /etc/selinux/config'
ubuntu16-1:
grep: /etc/selinux/config: No such file or directory
centos8-1:
SELINUX=Enforcing
centos8-2:
SELINUX=Enforcing
ERROR: Minions returned with non-zero exit code

10、控制salt远程执行的输出格式

1
2
3
4
5
6
7
8
9
10
11
12
13
14
15
16
17
18
19
20
21
22
23
24
25
26
27
28
29
30
31
32
33
34
35
36
37
38
39
40
41
42
43
44
45
46
47
48
49
50
51
52
53
54
55
56
57
58
59
60
61
62
63
64
65
66
67
68
69
70
71
72
73
74
75
76
77
78
79
80
81
82
83
84
85
86
87
88
89
90
91
92
93
94
95
96
97
98
99
[root@master ~]# salt 'centos8-1' disk.usage --out=json
{
"centos8-1": {
"/dev": {
"filesystem": "devtmpfs",
"1K-blocks": "3956880",
"used": "0",
"available": "3956880",
"capacity": "0%"
},
"/dev/shm": {
"filesystem": "tmpfs",
"1K-blocks": "3977008",
"used": "360",
"available": "3976648",
"capacity": "1%"
},
"/run": {
"filesystem": "tmpfs",
"1K-blocks": "3977008",
"used": "205296",
"available": "3771712",
"capacity": "6%"
},
"/sys/fs/cgroup": {
"filesystem": "tmpfs",
"1K-blocks": "3977008",
"used": "0",
"available": "3977008",
"capacity": "0%"
},
"/": {
"filesystem": "/dev/mapper/cs-root",
"1K-blocks": "73364480",
"used": "2712336",
"available": "70652144",
"capacity": "4%"
},
"/boot": {
"filesystem": "/dev/vda1",
"1K-blocks": "1038336",
"used": "203688",
"available": "834648",
"capacity": "20%"
},
"/run/user/0": {
"filesystem": "tmpfs",
"1K-blocks": "795400",
"used": "0",
"available": "795400",
"capacity": "0%"
}
}
}

[root@master ~]# salt 'centos8-1' disk.usage --out=yaml
centos8-1:
/:
1K-blocks: '73364480'
available: '70654116'
capacity: 4%
filesystem: /dev/mapper/cs-root
used: '2710364'
/boot:
1K-blocks: '1038336'
available: '834648'
capacity: 20%
filesystem: /dev/vda1
used: '203688'
/dev:
1K-blocks: '3956880'
available: '3956880'
capacity: 0%
filesystem: devtmpfs
used: '0'
/dev/shm:
1K-blocks: '3977008'
available: '3976628'
capacity: 1%
filesystem: tmpfs
used: '380'
/run:
1K-blocks: '3977008'
available: '3771712'
capacity: 6%
filesystem: tmpfs
used: '205296'
/run/user/0:
1K-blocks: '795400'
available: '795400'
capacity: 0%
filesystem: tmpfs
used: '0'
/sys/fs/cgroup:
1K-blocks: '3977008'
available: '3977008'
capacity: 0%
filesystem: tmpfs
used: '0'

7、salt基础模块使用

1、文件管理模块远程执行测试

文件管理是linux系统中必不可少的,所以作为一个自动化运维工具salt也有文件管理模块来对linux系统实现文件管理,salt的文件管理模块是file

1、file模块的所有用法

1
2
3
4
5
6
7
8
9
10
11
12
13
14
15
16
17
18
19
20
21
22
23
24
25
26
27
28
29
30
31
32
33
34
35
36
37
38
39
40
41
42
43
44
45
46
47
48
49
50
51
52
53
54
55
56
57
58
59
60
61
62
63
64
65
66
67
68
69
70
71
72
73
74
75
76
77
78
79
80
81
82
83
84
85
86
87
88
89
90
91
92
93
94
95
96
97
98
99
100
101
102
103
104
105
106
107
[root@master ~]# salt centos8-1 sys.list_functions file
centos8-1:
- file.access
- file.append
- file.apply_template_on_contents
- file.basename
- file.blockreplace
- file.chattr
- file.check_file_meta
- file.check_hash
- file.check_managed
- file.check_managed_changes
- file.check_perms
- file.chgrp
- file.chown
- file.chpgrp
- file.comment
- file.comment_line
- file.contains
- file.contains_glob
- file.contains_regex
- file.copy
- file.delete_backup
- file.directory_exists
- file.dirname
- file.diskusage
- file.extract_hash
- file.file_exists
- file.find
- file.get_attributes
- file.get_devmm
- file.get_diff
- file.get_gid
- file.get_group
- file.get_hash
- file.get_managed
- file.get_mode
- file.get_pgid
- file.get_pgroup
- file.get_selinux_context
- file.get_source_sum
- file.get_sum
- file.get_uid
- file.get_user
- file.gid_to_group
- file.grep
- file.group_to_gid
- file.is_blkdev
- file.is_chrdev
- file.is_fifo
- file.is_hardlink
- file.is_link
- file.join
- file.lchown
- file.line
- file.link
- file.list_backup
- file.list_backups
- file.list_backups_dir
- file.lsattr
- file.lstat
- file.makedirs
- file.makedirs_perms
- file.manage_file
- file.mkdir
- file.mknod
- file.mknod_blkdev
- file.mknod_chrdev
- file.mknod_fifo
- file.move
- file.namedtuple
- file.normpath
- file.open_files
- file.pardir
- file.patch
- file.path_exists_glob
- file.prepend
- file.psed
- file.read
- file.readdir
- file.readlink
- file.remove
- file.remove_backup
- file.rename
- file.replace
- file.restore_backup
- file.restorecon
- file.rmdir
- file.search
- file.sed
- file.sed_contains
- file.seek_read
- file.seek_write
- file.set_attributes
- file.set_mode
- file.set_perms
- file.set_selinux_context
- file.source_list
- file.stats
- file.statvfs
- file.symlink
- file.touch
- file.truncate
- file.uid_to_user
- file.uncomment
- file.user_to_uid
- file.write

2、文件的创建

1
2
3
4
5
6
7
8
9
10
11
12
13
14
[root@master ~]# salt '*' file.touch /root/file.test
ubuntu16-1:
True
centos8-1:
True
centos8-2:
True
[root@master ~]# salt '*' cmd.run "ls -l /root/file.test"
ubuntu16-1:
-rw-r--r-- 1 root root 0 Sep 12 09:21 /root/file.test
centos8-1:
-rw-r--r--. 1 root root 0 Sep 12 21:21 /root/file.test
centos8-2:
-rw-r--r--. 1 root root 0 Sep 12 21:21 /root/file.test

3、使用文档软件查看用法

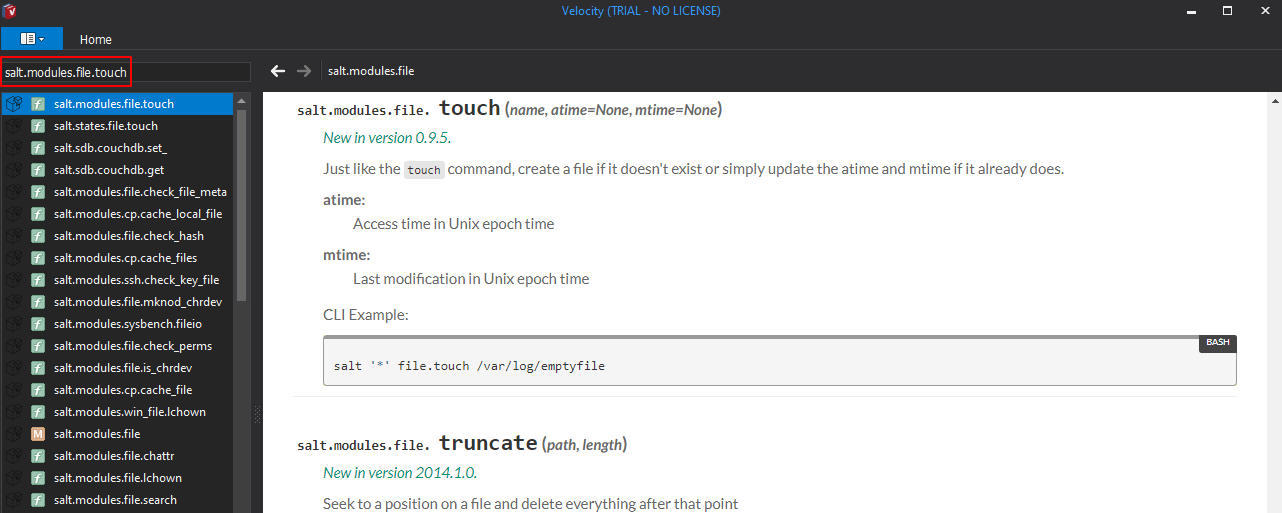
无论是ansible还是salt都支持使用velocity进行模块用法的查看。在velocity中,如果你想查看的是salt的远程执行模块,那么要以salt.modules开头查看,这和ansible不一样,ansible的每个模块既可以做adhoc也可以做playbook,但是salt的远程执行和配置管理是不完全相同的。

image-20210912213829735

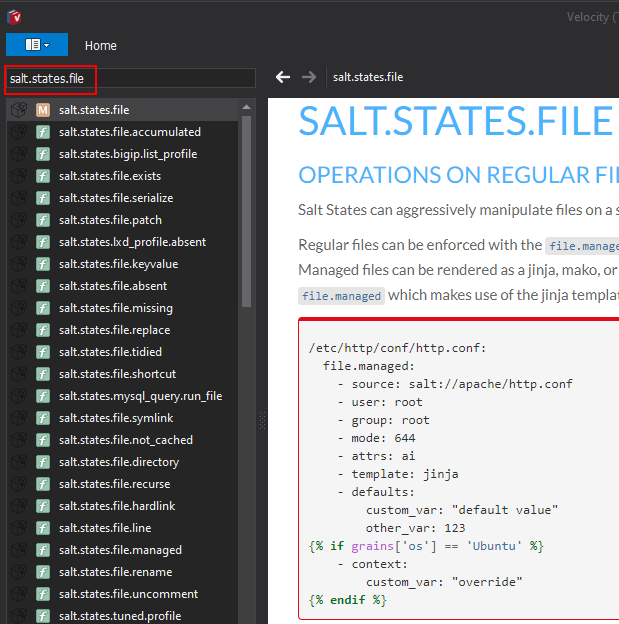
如果想搜索状态文件相关的,则需要搜索salt.states

image-20210912214306959

4、创建目录文件

1
2
3
4
5
6
7
8
9
10
11
12
13
14
15
16
17
18
19
20
21
22
23
24
[root@master ~]# salt ubuntu16-1 sys.doc file.mkdir
file.mkdir:

Ensure that a directory is available.

CLI Example:

salt '*' file.mkdir /opt/jetty/context

[root@master ~]# salt '*' file.mkdir /root/dir-test
ubuntu16-1:
None
centos8-1:
True
centos8-2:
True

[root@master ~]# salt '*' cmd.run "ls -ld /root/dir-test"
ubuntu16-1:
drwxr-xr-x 2 root root 4096 Sep 12 09:45 /root/dir-test
centos8-1:
drwxr-xr-x. 2 root root 6 Sep 12 21:45 /root/dir-test
centos8-2:
drwxr-xr-x. 2 root root 6 Sep 12 21:45 /root/dir-test

5、检查文件按是否存在

1
2
3
4
5
6
7
[root@master ~]# salt '*' file.directory_exists /root/dir-test
ubuntu16-1:
True
centos8-1:
True
centos8-2:
True

6、文件的拷贝

file.copy用法,拷贝文件的源是在被管理主机上,并不是将文件从salt master拷贝到salt minion上

1
2
3
4
5
6
7
8
9
10
11
12
13
14
15
[root@master ~]# salt \* file.copy /root/file.test /usr/local/bin/file-test
ubuntu16-1:
True
centos8-1:
True
centos8-2:
True

[root@master ~]# salt '*' cmd.run "ls -l /usr/local/bin/file-test"
ubuntu16-1:
-rw-r--r-- 1 root root 0 Sep 12 09:53 /usr/local/bin/file-test
centos8-1:
-rw-r--r--. 1 root root 0 Sep 12 21:53 /usr/local/bin/file-test
centos8-2:
-rw-r--r--. 1 root root 0 Sep 12 21:53 /usr/local/bin/file-test

7、文件夹的拷贝

1
2
3
4
5
6
7
8
9
10
11
12
13
[root@master ~]# salt \* file.copy /root/dir-test /usr/local/bin/dir-test recurse=True
ubuntu16-1:
True
centos8-1:
True
centos8-2:
True
[root@master ~]# salt '*' cmd.run "ls -ld /usr/local/bin/dir-test"ubuntu16-1:
drwxr-xr-x 2 root root 4096 Sep 12 09:55 /usr/local/bin/dir-test
centos8-1:
drwxr-xr-x. 2 root root 6 Sep 12 21:55 /usr/local/bin/dir-test
centos8-2:
drwxr-xr-x. 2 root root 6 Sep 12 21:55 /usr/local/bin/dir-test

8、文件的删除

1
2
3
4
5
6
7
8
9
10
11
12
13
14
15
16
17
18
19
20
21
22
23
24
25
26
27
28
29
30
31
32
33
34
35
36
37
[root@master ~]# salt ubuntu16-1 sys.doc file.remove
file.remove:

Remove the named file. If a directory is supplied, it will be recursively
deleted.

CLI Example:

salt '*' file.remove /tmp/foo

[root@master ~]# salt '*' file.remove /root/dir-testubuntu16-1:
True
centos8-1:
True
centos8-2:
True
[root@master ~]# salt '*' file.remove /root/file-test
ubuntu16-1:
False
centos8-1:
False
centos8-2:
False
[root@master ~]# salt '*' file.remove /usr/local/bin/dir-test
ubuntu16-1:
True
centos8-1:
True
centos8-2:
True
[root@master ~]# salt '*' file.remove /usr/local/bin/file-test
ubuntu16-1:
True
centos8-1:
True
centos8-2:
True

9、文件内容的替换

1
2
3
4
5
6
7
8
9
10
11
12
13
14
15
16
17
18
[root@master ~]# cat salt-function-guide.txt | grep '\- file' | grep replace 
- file.blockreplace
- file.replace

[root@master ~]# salt centos8-1 sys.doc file.replace
[root@master ~]# salt centos8-1 file.replace /etc/selinux/config pattern='^SELINUX.*' repl='SELINUX=enforcing'
centos8-1:
---
+++
@@ -4,7 +4,7 @@
# enforcing - SELinux security policy is enforced.
# permissive - SELinux prints warnings instead of enforcing.
# disabled - No SELinux policy is loaded.
-SELINUX=Permissive
+SELINUX=enforcing
# SELINUXTYPE= can take one of these three values:
# targeted - Targeted processes are protected,
# minimum - Modification of targeted policy. Only selected processes are protected.

2、selinux的管理

1、selinux所有用法

1
2
3
4
5
6
7
8
9
10
11
12
13
14
15
16
17
18
19
20
21
22
23
[root@master ~]# cat salt-function-guide.txt | grep '\- selinux' 
- selinux.fcontext_add_policy
- selinux.fcontext_apply_policy
- selinux.fcontext_delete_policy
- selinux.fcontext_get_policy
- selinux.fcontext_policy_is_applied
- selinux.filetype_id_to_string
- selinux.getconfig
- selinux.getenforce
- selinux.getsebool
- selinux.getsemod
- selinux.install_semod
- selinux.list_sebool
- selinux.list_semod
- selinux.port_add_policy
- selinux.port_delete_policy
- selinux.port_get_policy
- selinux.remove_semod
- selinux.selinux_fs_path
- selinux.setenforce
- selinux.setsebool
- selinux.setsebools
- selinux.setsemod

2、查看selinux状态

1
2
3
4
5
6
7
8
[root@master ~]# salt \* selinux.getenforce
centos8-1:
Enforcing
centos8-2:
Enforcing
ubuntu16-1:
'selinux' __virtual__ returned False
ERROR: Minions returned with non-zero exit code

3、设置selinux状态为enforcing

1
2
3
4
5
6
7
8
9
10
11
12
13
14
15
16
[root@master ~]# salt \*  sys.doc selinux.setenforce
selinux.setenforce:

Set the SELinux enforcing mode

CLI Example:

salt '*' selinux.setenforce enforcing
[root@master ~]# salt \* selinux.setenforce enforcing
centos8-1:
Enforcing
centos8-2:
Enforcing
ubuntu16-1:
'selinux' __virtual__ returned False
ERROR: Minions returned with non-zero exit code

4、设置selinux的状态为permissive

1
2
3
4
5
6
7
[root@master ~]# salt \*  selinux.setenforce permissive
ubuntu16-1:
Permissive
centos8-2:
Permissive
centos8-1:
Permissive

3、服务管理模块

1、service模块所有用法

1
2
3
4
5
6
7
8
9
10
11
12
13
14
15
16
17
18
19
20
21
22
23
24
25
[root@master ~]# cat salt-function-guide.txt | egrep '\- service'
- service.available
- service.disable
- service.disabled
- service.enable
- service.enabled
- service.execs
- service.firstboot
- service.force_reload
- service.get_all
- service.get_disabled
- service.get_enabled
- service.get_running
- service.get_static
- service.mask
- service.masked
- service.missing
- service.reload
- service.restart
- service.show
- service.start
- service.status
- service.stop
- service.systemctl_reload
- service.unmask

2、停止、查看、启动服务

1
2
3
4
5
6
7
8
9
10
11
12
13
14
15
16
17
18
19
20
21
22
23
24
25
26
27
28
29
30
31
32
33
34
[root@master ~]# salt \*  sys.doc service.stop
service.stop:

Stop the specified service with systemd

CLI Example:

salt '*' service.stop <service name>
[root@master ~]# salt \* service.stop sshd
ubuntu16-1:
True
centos8-1:
True
centos8-2:
True

root@eve-ng:~# ssh 101.163.9.103
ssh: connect to host 101.163.9.103 port 22: Connection refused

[root@master ~]# salt '*' service.status sshd
ubuntu16-1:
False
centos8-2:
False
centos8-1:
False

[root@master ~]# salt '*' service.start sshd
ubuntu16-1:
True
centos8-1:
True
centos8-2:
True

3、设置服务下次开启自启动

1
2
3
4
5
6
7
8
9
10
11
12
13
14
15
16
17
18
[root@master ~]# salt \*  sys.doc service.enable
service.enable:

Enable the named service to start when the system boots

CLI Example:

salt '*' service.enable <service name>

#ubuntu的ssh服务叫做ssh

[root@master ~]# salt '*' service.enable sshd
ubuntu16-1:
False
centos8-1:
True
centos8-2:
True

4、salt的用户组模块管理

1、查看用户组模块的所有用法

1
2
3
4
5
6
7
8
9
[root@master ~]# cat salt-function-guide.txt | grep '\- group'
- group.add
- group.adduser
- group.chgid
- group.delete
- group.deluser
- group.getent
- group.info
- group.members

2、添加用户组

1
2
3
4
5
6
7
8
9
10
11
12
13
14
15
16
17
18
19
20
21
22
23
24
25
26
27
28
29
30
31
32
33
34
35
36
37
38
39
40
41
42
43
44
45
46
47
48
49
50
51
52
53
54
55
56
[root@master ~]# salt centos8-1 sys.doc group.add
group.add:

Add the specified group

name
Name of the new group

gid
Use GID for the new group

[root@master ~]# salt '*' group.add foo 3456
ubuntu16-1:
True
centos8-2:
True
centos8-1:
True
[root@master ~]# salt '*' group.info foo
ubuntu16-1:
----------
gid:
3456
members:
name:
foo
passwd:
x
centos8-1:
----------
gid:
3456
members:
name:
foo
passwd:
x
centos8-2:
----------
gid:
3456
members:
name:
foo
passwd:
x

system
Create a system account

root
Directory to chroot into

CLI Example:

salt '*' group.add foo 3456

3、向用户组里面添加成员

1
2
3
4
5
6
7
8
9
10
11
12
13
14
15
16
17
18
19
20
21
22
23
24
25
26
27
28
29
30
31
32
33
34
[root@master ~]# salt centos8-1 sys.doc group.adduser
group.adduser:

Add a user in the group.

name
Name of the group to modify

username
Username to add to the group

root
Directory to chroot into

CLI Example:

salt '*' group.adduser foo bar

Verifies if a valid username 'bar' as a member of an existing group 'foo',
if not then adds it.
[root@master ~]# salt '*' group.adduser foo root
ubuntu16-1:
True
centos8-1:
True
centos8-2:
True
[root@master ~]# salt '*' cmd.run 'id root'
ubuntu16-1:
uid=0(root) gid=0(root) groups=0(root),3456(foo)
centos8-2:
uid=0(root) gid=0(root) groups=0(root),3456(foo)
centos8-1:
uid=0(root) gid=0(root) groups=0(root),3456(foo)

4、删除用户组

1
2
3
4
5
6
7
8
9
10
11
12
13
14
15
16
17
18
19
20
21
[root@master ~]# salt centos8-1 sys.doc group.delete
group.delete:

Remove the named group

name
Name group to delete

root
Directory to chroot into

CLI Example:

salt '*' group.delete foo
[root@master ~]# salt '*' group.delete foo
ubuntu16-1:
True
centos8-1:
True
centos8-2:
True

5、salt的用户管理

1、查看用户管理模块的所有用法

1
2
3
4
5
6
7
8
9
10
11
12
13
14
15
16
17
18
19
20
[root@master ~]# cat salt-function-guide.txt | grep '\- user'    - user.add
- user.chfullname
- user.chgid
- user.chgroups
- user.chhome
- user.chhomephone
- user.chloginclass
- user.chother
- user.chroomnumber
- user.chshell
- user.chuid
- user.chworkphone
- user.delete
- user.get_loginclass
- user.getent
- user.info
- user.list_groups
- user.list_users
- user.primary_group
- user.rename

2、添加一个用户

1
2
3
4
5
6
7
8
9
10
11
12
13
14
15
16
17
18
[root@master ~]# salt centos8-1 sys.doc user.add
salt '*' user.add name <uid> <gid> <groups> <home> <shell>

[root@master ~]# salt \* user.add test 3333
ubuntu16-1:
True
centos8-1:
True
centos8-2:
True

[root@master ~]# salt \* cmd.run 'id test'
ubuntu16-1:
uid=3333(test) gid=3333(test) groups=3333(test)
centos8-2:
uid=3333(test) gid=3333(test) groups=3333(test)
centos8-1:
uid=3333(test) gid=3333(test) groups=3333(test)

3、删除用户

1
2
3
4
5
6
7
[root@master ~]# salt \* user.delete test 
ubuntu16-1:
True
centos8-1:
True
centos8-2:
True

6、salt软件包管理(重要)

由于不同的linux发行版本对部分软件包名字的定义不同,所以在软件包是需要仔细琢磨的。

centos、rhel、fedora使用的是yum/dnf

ubuntu、debian使用的是apt

sels/opensuse使用的是zypper

在salt中只有一个包管理模块就是pkg,会自动识别操作系统,使用对应的软件包管理

1、查看pkg软件管理模块所有用法

1
2
3
4
5
6
7
8
9
10
11
12
13
14
15
16
17
18
19
20
21
22
23
24
25
26
27
28
29
30
31
32
33
34
35
36
37
38
39
40
41
42
43
44
45
46
47
48
49
50
51
52
53
54
55
[root@master ~]# cat salt-function-guide.txt | grep '\- pkg'
- pkg.available_version
- pkg.clean_metadata
- pkg.del_repo
- pkg.diff
- pkg.download
- pkg.file_dict
- pkg.file_list
- pkg.get_locked_packages
- pkg.get_repo
- pkg.group_diff
- pkg.group_info
- pkg.group_install
- pkg.group_list
- pkg.groupinstall
- pkg.hold
- pkg.info_installed
- pkg.install
- pkg.latest_version
- pkg.list_downloaded
- pkg.list_holds
- pkg.list_installed_patches
- pkg.list_patches
- pkg.list_pkgs
- pkg.list_repo_pkgs
- pkg.list_repos
- pkg.list_updates
- pkg.list_upgrades
- pkg.mod_repo
- pkg.modified
- pkg.normalize_name
- pkg.owner
- pkg.parse_arch
- pkg.purge
- pkg.refresh_db
- pkg.remove
- pkg.services_need_restart
- pkg.unhold
- pkg.update
- pkg.upgrade
- pkg.upgrade_available
- pkg.verify
- pkg.version
- pkg.version_cmp
- pkg_resource.add_pkg
- pkg_resource.check_extra_requirements
- pkg_resource.format_pkg_list
- pkg_resource.format_version
- pkg_resource.pack_sources
- pkg_resource.parse_targets
- pkg_resource.sort_pkglist
- pkg_resource.stringify
- pkg_resource.version
- pkg_resource.version_clean
- pkg_resource.version_compare

2、安装ubuntu和centos软件包名一样的软件

1
2
3
4
5
6
7
8
9
10
11
12
13
14
15
16
17
18
19
20
21
22
23
24
25
26
27
28
29
30
31
32
33
34
35
36

[root@master ~]# salt \* pkg.install tree
centos8-2:
----------
centos8-1:
----------
ubuntu16-1:
----------
tree:
----------
new:
1.7.0-3
old:

[root@master ~]# salt \* pkg.install htop
ubuntu16-1:
----------
htop:
----------
new:
2.0.1-1ubuntu1
old:
centos8-2:
----------
htop:
----------
new:
3.0.5-1.el8
old:
centos8-1:
----------
htop:
----------
new:
3.0.5-1.el8
old:

3、安装ubuntu和centos软件包名不一样的软件

我们想安装apache作为我们的web服务器,我们选择了安装httpd,在centos平台是没问题的,但是ubuntu的软件包名是apache2

1
2
3
4
5
6
7
8
9
10
11
12
13
14
15
16
17
18
19
20
21
22
23
24
25
26
27
28
29
30
31
32
33
34
35
36
37
38
39
40
41
42
43
44
45
46
47
48
49
50
51
52
53
54
55
56
57
58
59
60
61
62
63
64
65
66
67
68
69
70
71
72
73
74
75
76
77
78
79
80
81
82
83
84
85
86
87
88
89
90
91
92
93
94
95
96
97
98
99
100
101
102
103
104
105
106
107
108
109
110
111
112
113
114
115
116
117
118
119
120
121
122
123
124
125
126
127
128
129
130
131
132
133
134
135
136
137
138
139
140
141
142
143
144
145
146
147
148
149
150
151
152
153
154
155
156
157
158
159
160
161
162
163
164
165
166
167
168
169
170
171
172
173
174
175
176
177
178
179
180
181
182
183
184
185
186
[root@master ~]# salt \* pkg.install httpd
ubuntu16-1:
----------
centos8-1:
----------
apr:
----------
new:
1.6.3-11.el8
old:
apr-util:
----------
new:
1.6.1-6.el8
old:
apr-util-bdb:
----------
new:
1.6.1-6.el8
old:
apr-util-openssl:
----------
new:
1.6.1-6.el8
old:
centos-logos-httpd:
----------
new:
85.8-1.el8
old:
httpd:
----------
new:
2.4.37-39.module_el8.4.0+778+c970deab
old:
httpd-filesystem:
----------
new:
2.4.37-39.module_el8.4.0+778+c970deab
old:
httpd-tools:
----------
new:
2.4.37-39.module_el8.4.0+778+c970deab
old:
mod_http2:
----------
new:
1.15.7-3.module_el8.4.0+778+c970deab
old:
centos8-2:
----------
apr:
----------
new:
1.6.3-11.el8
old:
apr-util:
----------
new:
1.6.1-6.el8
old:
apr-util-bdb:
----------
new:
1.6.1-6.el8
old:
apr-util-openssl:
----------
new:
1.6.1-6.el8
old:
centos-logos-httpd:
----------
new:
85.8-1.el8
old:
httpd:
----------
new:
2.4.37-39.module_el8.4.0+778+c970deab
old:
httpd-filesystem:
----------
new:
2.4.37-39.module_el8.4.0+778+c970deab
old:
httpd-tools:
----------
new:
2.4.37-39.module_el8.4.0+778+c970deab
old:
mod_http2:
----------
new:
1.15.7-3.module_el8.4.0+778+c970deab
old:

[root@master ~]# salt \* pkg.install apache2
centos8-1:
ERROR: Error occurred installing package(s). Additional info follows:

changes:
----------
errors:
- Running scope as unit: run-ra47c32dd31484559ac5e1949ec0f2a50.scope
Last metadata expiration check: 1:41:05 ago on Mon Sep 13 14:49:06 2021.
No match for argument: apache2
Error: Unable to find a match: apache2
centos8-2:
ERROR: Error occurred installing package(s). Additional info follows:

changes:
----------
errors:
- Running scope as unit: run-rfa356d0004af45b89d4734282e66b92e.scope
Last metadata expiration check: 3:04:40 ago on Mon Sep 13 13:25:31 2021.
No match for argument: apache2
Error: Unable to find a match: apache2
ubuntu16-1:
----------
apache2:
----------
new:
2.4.18-2ubuntu3.17
old:
apache2-api-20120211:
----------
new:
1
old:
apache2-bin:
----------
new:
2.4.18-2ubuntu3.17
old:
apache2-data:
----------
new:
2.4.18-2ubuntu3.17
old:
apache2-utils:
----------
new:
2.4.18-2ubuntu3.17
old:
httpd:
----------
new:
1
old:
httpd-cgi:
----------
new:
1
old:
libapr1:
----------
new:
1.5.2-3
old:
libaprutil1:
----------
new:
1.5.4-1build1
old:
libaprutil1-dbd-sqlite3:
----------
new:
1.5.4-1build1
old:
libaprutil1-ldap:
----------
new:
1.5.4-1build1
old:
liblua5.1-0:
----------
new:
5.1.5-8ubuntu1
old:
ssl-cert:
----------
new:
1.0.37
old:

4、卸载软件包

1
2
3
4
5
6
7
8
9
10
11
12
13
14
15
16
17
18
19
20
21
22
23
24
25
26
27
28
29
30
31
32
33
34
35
36
37
38
39
40
41
42
43
44
45
46
47
48
49
50
51
52
53
54
55
56
57
58
59
60
61
62
63
64
65
66
67
68
[root@master ~]# salt 'ubuntu16-1' pkg.remove apache2
ubuntu16-1:
----------
apache2:
----------
new:
old:
2.4.18-2ubuntu3.17
httpd:
----------
new:
old:
1
httpd-cgi:
----------
new:
old:
1
[root@master ~]# salt 'centos8*' pkg.remove httpd
centos8-1:
----------
centos8-2:
----------
apr:
----------
new:
old:
1.6.3-11.el8
apr-util:
----------
new:
old:
1.6.1-6.el8
apr-util-bdb:
----------
new:
old:
1.6.1-6.el8
apr-util-openssl:
----------
new:
old:
1.6.1-6.el8
centos-logos-httpd:
----------
new:
old:
85.8-1.el8
httpd:
----------
new:
old:
2.4.37-39.module_el8.4.0+778+c970deab
httpd-filesystem:
----------
new:
old:
2.4.37-39.module_el8.4.0+778+c970deab
httpd-tools:
----------
new:
old:
2.4.37-39.module_el8.4.0+778+c970deab
mod_http2:
----------
new:
old:
1.15.7-3.module_el8.4.0+778+c970deab

7、salt远程执行的文件拷贝

salt上文件拷贝到minion上,使用salt-cp

1
2
3
4
5
6
7
8
9
10
11
12
13
14
15
16
17
18
19
20
21
22
23
24
25
26
27
28
29
[root@master ~]# salt-cp -h
Usage: salt-cp [options] '<target>' SOURCE DEST

[root@master ~]# salt-cp '*' /root/salt-function-guide.txt /root/salt-function-guide.txt
centos8-1:
----------
/root/salt-function-guide.txt:
True
centos8-2:
----------
/root/salt-function-guide.txt:
True
ubuntu16-1:
----------
/root/salt-function-guide.txt:
True

[root@master ~]# salt \* cmd.run 'ls /root/'
ubuntu16-1:
file.test
salt-function-guide.txt
centos8-1:
anaconda-ks.cfg
file.test
salt-function-guide.txt
centos8-2:
anaconda-ks.cfg
file.test
salt-function-guide.txt

8、salt的配置管理

1、配置管理介绍

远程执行可以节省大量时间,但也有一些缺点。您执行的大多数任务是许多命令、测试和操作的组合,每一个都有它们自己的细微差别和失败点,通常会尝试将所有这些步骤合并到一个中心shell脚本中,但这些步骤很快就会变得笨拙,并带来它们自己的麻烦。

为了解决这个问题, SaltStack配置管理允许您创建一个可reuse的配置模板,称为state(状态),它描述将系统组件或应用程序放入已知配置所需的所有内容。

当你看到他们的运行时,它们会更容易理解,所以让我们创建一个,状态使用YAML进行描述,创建和读取都很简单。#如果我们想创这一个状态文件,状态文件必须放入指定的位置,至于放在哪里取决于你的配置文件

2、修改salt master的配置文件

定义了四个环境路径

1
2
3
4
5
6
7
8
9
10
11
[root@master ~]# egrep -v '^#|^$' /etc/salt/master
auto_accept: true
file_roots:
base:
- /srv/salt/base
test:
- /srv/salt/test
dev:
- /srv/salt/dev
prod:
- /srv/salt/prod

3、创建状态文件环境目录

在这里面的环境可以直接应用于生产环境

test=true 模拟运行

dev环境是为开发人员提供开发测试的环境

prod环境是生产环境部署用到的

随着容器的发展,对于运维人员来说已经很少要给开发提供开发环境了,开发人员自己就可以pull一个自己需要的开发环境的container,但是我们也可以在salt上对容器进行管理,更好的方法还是salt 去操作容器平台编排平台开放的api。然后去通过容器编排平台为开发人员提供发开环境。

1
2
3
4
5
6
7
8
9
10
11
[root@master ~]# mkdir /srv/salt/{base,test,dev,prod} -p
[root@master ~]# tree /srv/salt/
/srv/salt/
├── base
├── dev
├── prod
└── test

4 directories, 0 files

[root@master ~]# systemctl restart salt-master

4、第一个状态文件

1
2
3
4
5
6
7
8
9
10
11
[root@master base]# cd /srv/salt/base
[root@master base]# cat software.sls
iotop:
pkg.installd:

[root@master base]# cat software.sls
install some software:
pkg.installd:
- name: iotop
#如果你的ID,是一个salt函数所操作的名字,那么你后面针对这个状态的所有的函数使用都可以使用这个1D所定义的名字
#salt状态函数都必须至少包含-name的参数,但是如果你把salt函数-name:所指定的内容,定义成sa1t的状态1D,那么-name就可以容略.

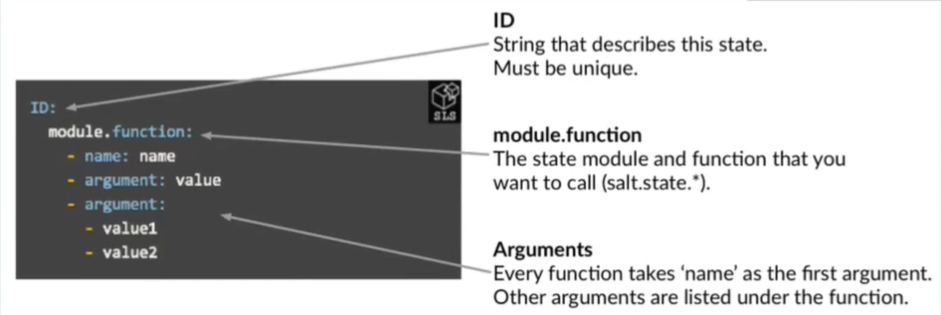
image-20210913221047364

每个函数都接受一个name参数。如果没有为name定义值, Salt将使用状态ID作为name的值。在本例中, name参数为https://github.com/saltstack/salt.git:

image-20210913222103214

使用ID作为name的参数在有经验的用户中很流行,这是因为简单。你也可以这样写这个状态:

image-20210913222137195

建议使用第二种格式并始终定义name参数。ID应该描述状态正在做什么,尽管可能需要更多的输入。遵循这种格式可以使您的状态更一致,更容易重用、维护和调试。**(官方建议)**

1
2
3
4
5
6
7
8
[root@master base]# cat software1.sls 
iotop:
pkg.installed
#后面没参数就不用写冒号
[root@master base]# cat software2.sls
install some software:
pkg.installed:
- name: iotop

5、运行第一个状态文件

如果环境相对复杂,一定要在应用salt状态文件的时候指定环境,默认的环境是base环境,状态文件执行的函数和远程执行的函数不太一样,但是长相差不多。原因是salt的远程执行和配置管理使用的函数是不一样的(一小部分是一样的)。这点和ansible是完全不一样的。

1
2
3
4
5
6
7
8
9
10
11
12
13
14
15
16
17
18
19
20
21
22
23
24
25
26
27
28
29
30
31
32
33
34
35
36
37
38
39
40
41
42
43
44
45
46
47
48
49
50
51
52
salt 'target' state.sls saltenv='env-name' sls.name 

[root@master ~]# salt 'centos8-1' state.sls software1
centos8-1:
----------
ID: iotop
Function: pkg.installed
Result: True
Comment: The following packages were installed/updated: iotop
Started: 23:17:40.603319
Duration: 8261.701 ms
Changes:
----------
iotop:
----------
new:
0.6-16.el8
old:

Summary for centos8-1
------------
Succeeded: 1 (changed=1)
Failed: 0
------------
Total states run: 1
Total run time: 8.262 s

[root@master ~]# salt 'centos8-2' state.sls software2
centos8-2:
----------
ID: install some software
Function: pkg.installed
Name: iotop
Result: True
Comment: The following packages were installed/updated: iotop
Started: 23:19:22.452698
Duration: 8457.777 ms
Changes:
----------
iotop:
----------
new:
0.6-16.el8
old:

Summary for centos8-2
------------
Succeeded: 1 (changed=1)
Failed: 0
------------
Total states run: 1
Total run time: 8.458 s

6、一个简单的web状态

1、软件仓库配置(完成)

2、安装软件

3、写网页

使用了状态函数pkg.installed,file.append,service.running三个函数

1
2
3
4
5
6
7
8
9
10
11
12
13
14
15
16
17
18
19
20
21
22
[root@master test]# cat  web.sls 
install httpd:
pkg.installed:
- name: httpd
install apache2:
pkg.installed:
- name: apache2
delete default web content:
cmd.run:
- name: "rm -rf /var/www/html/index.html"
set web content:
file.append:
- name: /var/www/html/index.html
- text: "this is a web test"
start httpd:
service.running:
- name: httpd
- enable: yes
start apache:
service.running:
- name: apache2
- enable: yes

image-20210914093204317

7、zabbix-allinone部署

1、文件目录

1
2
3
4
5
6
7
8
[root@master prod]# tree
.
├── template
│   ├── zabbix-nginx.conf.j2
│   ├── zabbix-php.conf.j2
│   └── zabbix_server.conf.j2
├── zabbix-allinone.sls
└── zabbix.repo

2、zabbix-allinone.sls

1
2
3
4
5
6
7
8
9
10
11
12
13
14
15
16
17
18
19
20
21
22
23
24
25
26
27
28
29
30
31
32
33
34
35
36
37
38
39
40
41
42
43
44
45
46
47
48
49
50
51
52
53
54
55
56
57
58
59
60
61
62
63
64
65
66
67
68
69
70
71
72
73
74
75
76
77
78
79
80
81
82
83
84
85
86
87
88
89
90
disable selinux:
selinux.mode:
- name: permissive
disbale firewalld:
service.dead:
- name: firewalld
- enable: no
copy zabbix repo:
file.managed:
- name: /etc/yum.repos.d/zabbix.repo
- source: salt://zabbix.repo
install all pkgs for zabbix:
pkg.installed:
- pkgs:
- mariadb-server
- zabbix-server-mysql
- python3-PyMySQL
- zabbix-web-mysql
- zabbix-nginx-conf
start mariadb service:
service.running:
- name: mariadb
- enable: yes
create a database for zabbix:
mysql_database.present:
- name: zabbix
- character_set: utf8
- collate: utf8_bin
create a local zabbix user:
mysql_user.present:
- name: zabbix
- host: 'localhost'
- password: zabbix
create a zabbix user:
mysql_user.present:
- name: zabbix
- host: '%'
- password: zabbix
grant some privileges for local zabbix user:
mysql_grants.present:
- name: zabbix
- grant: all privileges
- database: zabbix.*
- user: zabbix
- host: 'localhost'
grant some privileges for remote zabbix user:
mysql_grants.present:
- name: zabbix
- grant: all privileges
- database: zabbix.*
- user: zabbix
- host: '%'
import zabbix db:
cmd.run:
- name: 'zcat /usr/share/doc/zabbix-server-mysql/create.sql.gz | mysql -uzabbix -pzabbix zabbix'
- onchanges:
- create a database for zabbix
- require:
- create a database for zabbix
set zabbix server cfg:
file.managed:
- source: salt://template/zabbix_server.conf.j2
- name: /etc/zabbix/zabbix_server.conf
- mode: 777
- template: jinja
- defaults:
zabbix_db_ip: #allinone机器ip
zabbix_db_name: zabbix
zabbix_db_user: zabbix
zabbix_db_password: zabbix
set zabbix nginx cfg:
file.managed:
- source: salt://template/zabbix-nginx.conf.j2
- name: /etc/nginx/conf.d/zabbix.conf
- mode: 644
- template: jinja
set zabbix php cfg:
file.managed:
- source: salt://template/zabbix-php.conf.j2
- name: /etc/php-fpm.d/zabbix.conf
- mode: 644
- template: jinja
start nginx service:
service.running:
- name: nginx
- enbale: yes
start php service:
service.running:
- name: php-fpm
- enable: yes

3、zabbix.repo

1
2
3
4
5
[zabbix]
name=zabbix
baseurl=https://mirrors.tuna.tsinghua.edu.cn/zabbix/zabbix/5.0/rhel/8/x86_64/
gpgcheck=0
enabled=1

4、template文件夹

1
2
3
4
5
6
7
8
9
10
11
12
13
14
15
16
17
18
19
20
21
22
23
24
25
26
27
28
29
30
31
32
33
34
35
36
37
38
39
40
41
42
43
44
45
46
47
48
49
50
51
52
53
54
55
56
57
58
59
60
61
62
63
64
65
66
67
68
69
70
71
72
73
74
75
76
77
78
79
80
81
82
83
84
85
86
87
88
89
90
91
92
93
94
95
96
97
98
99
100
101
[root@master template]# egrep -v '^#|^$' zabbix-nginx.conf.j2 
server {
listen 80;
server_name #allinone机器ip;

root /usr/share/zabbix;

index index.php;

location = /favicon.ico {
log_not_found off;
}

location / {
try_files $uri $uri/ =404;
}

location /assets {
access_log off;
expires 10d;
}

location ~ /\.ht {
deny all;
}

location ~ /(api\/|conf[^\.]|include|locale|vendor) {
deny all;
return 404;
}

location ~ [^/]\.php(/|$) {
fastcgi_pass unix:/run/php-fpm/zabbix.sock;
fastcgi_split_path_info ^(.+\.php)(/.+)$;
fastcgi_index index.php;

fastcgi_param DOCUMENT_ROOT /usr/share/zabbix;
fastcgi_param SCRIPT_FILENAME /usr/share/zabbix$fastcgi_script_name;
fastcgi_param PATH_TRANSLATED /usr/share/zabbix$fastcgi_script_name;

include fastcgi_params;
fastcgi_param QUERY_STRING $query_string;
fastcgi_param REQUEST_METHOD $request_method;
fastcgi_param CONTENT_TYPE $content_type;
fastcgi_param CONTENT_LENGTH $content_length;

fastcgi_intercept_errors on;
fastcgi_ignore_client_abort off;
fastcgi_connect_timeout 60;
fastcgi_send_timeout 180;
fastcgi_read_timeout 180;
fastcgi_buffer_size 128k;
fastcgi_buffers 4 256k;
fastcgi_busy_buffers_size 256k;
fastcgi_temp_file_write_size 256k;
}
}


[root@master template]# egrep -v '^#|^$' zabbix-php.conf.j2
[zabbix]
user = apache
group = apache

listen = /run/php-fpm/zabbix.sock
listen.acl_users = apache,nginx
listen.allowed_clients = 127.0.0.1

pm = dynamic
pm.max_children = 50
pm.start_servers = 5
pm.min_spare_servers = 5
pm.max_spare_servers = 35

php_value[session.save_handler] = files
php_value[session.save_path] = /var/lib/php/session

php_value[max_execution_time] = 300
php_value[memory_limit] = 128M
php_value[post_max_size] = 16M
php_value[upload_max_filesize] = 2M
php_value[max_input_time] = 300
php_value[max_input_vars] = 10000
php_value[date.timezone] = Asia/Shanghai


[root@master template]# egrep -v '^#|^$' zabbix_server.conf.j2
LogFile=/var/log/zabbix/zabbix_server.log
LogFileSize=0
PidFile=/var/run/zabbix/zabbix_server.pid
SocketDir=/var/run/zabbix
DBHost={{ zabbix_db_ip }}
DBName={{ zabbix_db_name }}
DBUser={{ zabbix_db_user }}
DBPassword={{ zabbix_db_password }}
SNMPTrapperFile=/var/log/snmptrap/snmptrap.log
Timeout=4
AlertScriptsPath=/usr/lib/zabbix/alertscripts
ExternalScripts=/usr/lib/zabbix/externalscripts
LogSlowQueries=3000
StatsAllowedIP=127.0.0.1

5、运行测试

1
salt 'centos8-2' state.sls zabbix-allinone saltenv='prod'

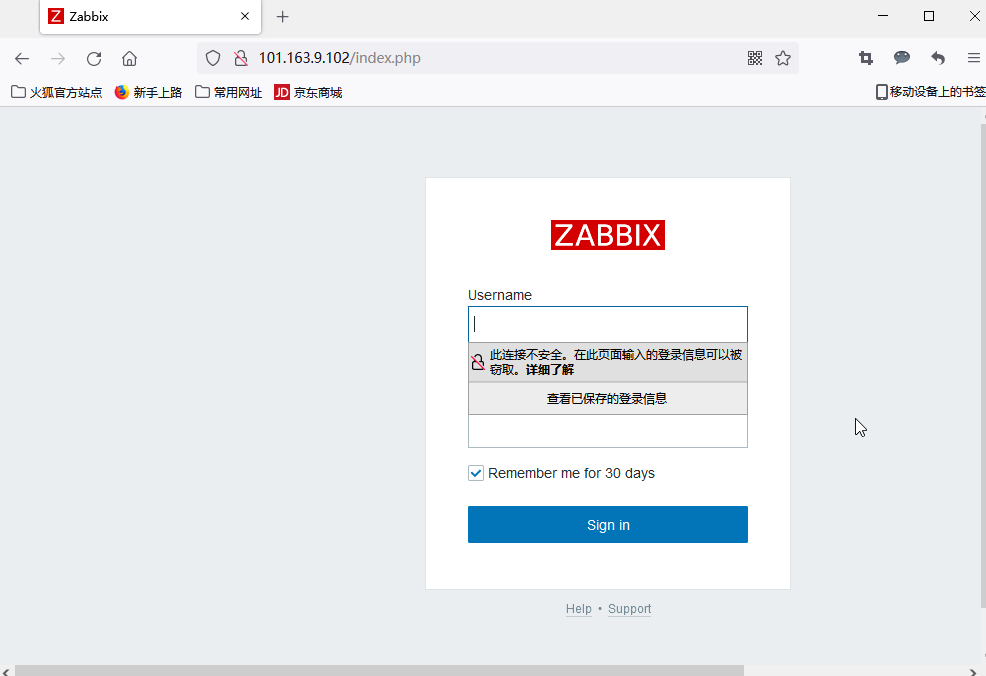
image-20210919215244414

9、grains静态信息(ansible facts)

grains信息是记录在minion本地的,grains虽然记录的是minion本地的信息,但是又和facts变量是动态搜索的信息。但是grains是静态信息。grains信息在minion端,会被minion定期的搜集,facts变量是当control节点需要搜索facts的时候才在被管理主机上动态生成的。

1、grains场景

如果你刚入职一家工作担任运维总监,你的老板让你整合公司里面所有的服务器的信息,因为上个离职哥们是一个心杯不满的员工,服务器数量比较多,多达2000多个节点.你是一台台登录。还是选择用白动化运椎工具搜集呢?如果你不了解自动化运推工具,对你来说可能使用shell脚本是个不错的选择,但是2000多台节点,你使用shell脚本难度说实话有点高,如果你用ansible,那么你一定会使用的facts变量,如果你用salt,那么你一定会使用grains.

因为2000多个服务器操作系统,不包含虚拟化的场景,也是一个相当庞大的数量,而且针对应用的不同、操作系统的发行版本和版本号也不完全一致。所以针对此种复杂的场景,一定要有一个自动化运维工具来帮你完成这个操作。

2、grains介绍

grains是salt中非常重要的东西,如果你用salt作为生产环境中的自动化运维工具,那么你的grains使用的频率是百分之百。grains记录了minion上的静态信息,cup、内存、磁盘、网络。minion采集到的信息是会汇报给master的。master可以随时检索minion搜集的grains信息。grains存放的信息同样是以key value的形式存放的。

3、查看grains所有的用法

1
2
3
4
5
6
7
8
9
10
11
12
13
14
15
16
17
18
[root@master ~]# salt centos8-1 sys.list_functions grains
centos8-1:
- grains.append
- grains.delkey
- grains.delval
- grains.equals
- grains.fetch
- grains.filter_by
- grains.get
- grains.get_or_set_hash
- grains.has_value
- grains.item
- grains.items
- grains.ls
- grains.remove
- grains.set
- grains.setval
- grains.setvals

4、查看所有的grains信息

1
2
3
4
5
6
7
8
9
10
11
12
13
14
15
16
17
18
19
20
21
22
23
24
25
26
27
28
29
30
31
32
33
34
35
36
37
38
39
40
41
42
43
44
45
46
47
48
49
50
51
52
53
54
55
56
57
58
59
60
61
62
63
64
65
66
67
68
69
70
71
72
73
74
75
76
77
78
79
80
81
82
[root@master ~]# salt centos8-1 grains.ls
centos8-1:
- biosreleasedate
- biosversion
- cpu_flags
- cpu_model
- cpuarch
- cwd
- disks
- dns
- domain
- fqdn
- fqdn_ip4
- fqdn_ip6
- fqdns
- gid
- gpus
- groupname
- host
- hwaddr_interfaces
- id
- init
- ip4_gw
- ip4_interfaces
- ip6_gw
- ip6_interfaces
- ip_gw
- ip_interfaces
- ipv4
- ipv6
- kernel
- kernelparams
- kernelrelease
- kernelversion
- locale_info
- localhost
- lsb_distrib_codename
- lsb_distrib_id
- lsb_distrib_release
- lvm
- machine_id
- manufacturer
- master
- mdadm
- mem_total
- nodename
- num_cpus
- num_gpus
- os
- os_family
- osarch
- oscodename
- osfinger
- osfullname
- osmajorrelease
- osrelease
- osrelease_info
- path
- pid
- productname
- ps
- pythonexecutable
- pythonpath
- pythonversion
- saltpath
- saltversion
- saltversioninfo
- selinux
- serialnumber
- server_id
- shell
- ssds
- swap_total
- systemd
- systempath
- uid
- username
- uuid
- virtual
- zfs_feature_flags
- zfs_support
- zmqversion
1
2
3
4
5
6
7
8
9
10
11
12
13
14
15
16
17
18
19
20
21
22
23
24
25
26
27
28
29
30
31
32
33
34
35
36
37
38
39
40
41
42
43
44
45
46
47
48
49
50
51
52
53
54
55
56
57
58
59
60
61
62
63
64
65
66
67
68
69
70
71
72
73
74
75
76
77
78
79
80
81
82
83
84
85
86
87
88
89
90
91
92
93
94
95
96
97
98
99
100
101
102
103
104
105
106
107
108
109
110
111
112
113
114
115
116
117
118
119
120
121
122
123
124
125
126
127
128
129
130
131
132
133
134
135
136
137
138
139
140
141
142
143
144
145
146
147
148
149
150
151
152
153
154
155
156
157
158
159
160
161
162
163
164
165
166
167
168
169
170
171
172
173
174
175
176
177
178
179
180
181
182
183
184
185
186
187
188
189
190
191
192
193
194
195
196
197
198
199
200
201
202
203
204
205
206
207
208
209
210
211
212
213
214
215
216
217
218
219
220
221
222
223
224
225
226
227
228
229
230
231
232
233
234
235
236
237
238
239
240
241
242
243
244
245
246
247
248
249
250
251
252
253
254
255
256
257
258
259
260
261
262
263
264
265
266
267
268
269
270
271
272
273
274
275
276
277
278
279
280
281
282
283
284
285
286
287
288
289
290
291
292
293
294
295
296
297
298
299
300
301
302
303
304
305
306
307
308
309
310
311
312
313
314
315
316
317
318
319
320
321
322
323
324
325
326
327
328
329
330
331
[root@master ~]# salt centos8-1 grains.items --out=json
{
"centos8-1": {
"cwd": "/",
"ip_gw": true,
"ip4_gw": "101.163.9.200",
"ip6_gw": false,
"dns": {
"nameservers": [
"114.114.114.114"
],
"ip4_nameservers": [
"114.114.114.114"
],
"ip6_nameservers": [],
"sortlist": [],
"domain": "",
"search": [],
"options": []
},
"fqdns": [
"minion1"
],
"machine_id": "14bcc04c05b44dcc9813240306f9012a",
"master": "101.163.9.100",
"server_id": 1459538702,
"localhost": "minion1",
"fqdn": "minion1",
"host": "minion1",
"domain": "",
"hwaddr_interfaces": {
"lo": "00:00:00:00:00:00",
"eth0": "50:00:00:03:00:00",
"eth1": "50:00:00:03:00:01",
"eth2": "50:00:00:03:00:02",
"eth3": "50:00:00:03:00:03"
},
"id": "centos8-1",
"ip4_interfaces": {
"lo": [
"127.0.0.1"
],
"eth0": [
"101.163.9.101"
],
"eth1": [],
"eth2": [],
"eth3": []
},
"ip6_interfaces": {
"lo": [
"::1"
],
"eth0": [
"fe80::a5cc:3fc5:dc98:8951",
"fe80::be6a:c001:7a2a:3f83",
"fe80::c612:ca3:b68a:fb31"
],
"eth1": [
"fe80::d2a2:4115:aaf:204e"
],
"eth2": [
"fe80::9305:46c4:d68e:be88"
],
"eth3": [
"fe80::5ae1:82e3:b48a:a3a1"
]
},
"ipv4": [
"101.163.9.101",
"127.0.0.1"
],
"ipv6": [
"::1",
"fe80::a5cc:3fc5:dc98:8951",
"fe80::be6a:c001:7a2a:3f83",
"fe80::c612:ca3:b68a:fb31"
],
"fqdn_ip4": [
"101.163.9.101"
],
"fqdn_ip6": [
"fe80::c612:ca3:b68a:fb31",
"fe80::be6a:c001:7a2a:3f83",
"fe80::a5cc:3fc5:dc98:8951"
],
"ip_interfaces": {
"lo": [
"127.0.0.1",
"::1"
],
"eth0": [
"101.163.9.101",
"fe80::a5cc:3fc5:dc98:8951",
"fe80::be6a:c001:7a2a:3f83",
"fe80::c612:ca3:b68a:fb31"
],
"eth1": [
"fe80::d2a2:4115:aaf:204e"
],
"eth2": [
"fe80::9305:46c4:d68e:be88"
],
"eth3": [
"fe80::5ae1:82e3:b48a:a3a1"
]
},
"kernelparams": [
[
"BOOT_IMAGE",
"(hd0,msdos1)/vmlinuz-4.18.0-269.el8.x86_64"
],
[
"root",
"/dev/mapper/cs-root"
],
[
"ro",
null
],
[
"crashkernel",
"auto"
],
[
"resume",
"/dev/mapper/cs-swap"
],
[
"rd.lvm.lv",
"cs/root"
],
[
"rd.lvm.lv",
"cs/swap"
],
[
"rhgb",
null
],
[
"net.ifnames",
"0"
],
[
"biosdevname",
"0"
]
],
"locale_info": {
"defaultlanguage": "en_US",
"defaultencoding": "UTF-8",
"detectedencoding": "UTF-8",
"timezone": "CST"
},
"num_gpus": 1,
"gpus": [
{
"vendor": "unknown",
"model": "Device 1111"
}
],
"kernel": "Linux",
"nodename": "minion1",
"kernelrelease": "4.18.0-269.el8.x86_64",
"kernelversion": "#1 SMP Tue Jan 12 17:55:05 UTC 2021",
"cpuarch": "x86_64",
"selinux": {
"enabled": true,
"enforced": "Permissive"
},
"systemd": {
"version": "239",
"features": "+PAM +AUDIT +SELINUX +IMA -APPARMOR +SMACK +SYSVINIT +UTMP +LIBCRYPTSETUP +GCRYPT +GNUTLS +ACL +XZ +LZ4 +SECCOMP +BLKID +ELFUTILS +KMOD +IDN2 -IDN +PCRE2 default-hierarchy=legacy"
},
"init": "systemd",
"lsb_distrib_id": "CentOS Stream",
"lsb_distrib_release": "8",
"lsb_distrib_codename": "CentOS Stream 8",
"osfullname": "CentOS Stream",
"osrelease": "8",
"oscodename": "CentOS Stream 8",
"os": "CentOS Stream",
"num_cpus": 4,
"cpu_model": "Intel(R) Xeon(R) CPU E5-2678 v3 @ 2.50GHz",
"cpu_flags": [
"fpu",
"vme",
"de",
"pse",
"tsc",
"msr",
"pae",
"mce",
"cx8",
"apic",
"sep",
"mtrr",
"pge",
"mca",
"cmov",
"pat",
"pse36",
"clflush",
"mmx",
"fxsr",
"sse",
"sse2",
"ss",
"syscall",
"nx",
"pdpe1gb",
"rdtscp",
"lm",
"constant_tsc",
"arch_perfmon",
"rep_good",
"nopl",
"cpuid",
"tsc_known_freq",
"pni",
"pclmulqdq",
"vmx",
"ssse3",
"fma",
"cx16",
"pcid",
"sse4_1",
"sse4_2",
"x2apic",
"movbe",
"popcnt",
"tsc_deadline_timer",
"aes",
"xsave",
"avx",
"f16c",
"rdrand",
"hypervisor",
"lahf_lm",
"abm",
"cpuid_fault",
"invpcid_single",
"pti",
"tpr_shadow",
"vnmi",
"flexpriority",
"ept",
"vpid",
"ept_ad",
"fsgsbase",
"tsc_adjust",
"bmi1",
"avx2",
"smep",
"bmi2",
"erms",
"invpcid",
"xsaveopt",
"arat"
],
"os_family": "RedHat",
"osarch": "x86_64",
"mem_total": 7767,
"swap_total": 8091,
"biosversion": "rel-1.8.2-0-g33fbe13 by qemu-project.org",
"productname": "Standard PC (i440FX + PIIX, 1996)",
"manufacturer": "QEMU",
"biosreleasedate": "04/01/2014",
"uuid": "a17a0c1e-5f1f-4db1-90bc-5055a04a50aa",
"serialnumber": "",
"virtual": "kvm",
"ps": "ps -efHww",
"osrelease_info": [
8
],
"osmajorrelease": 8,
"osfinger": "CentOS Stream-8",
"path": "/usr/local/sbin:/usr/local/bin:/usr/sbin:/usr/bin",
"systempath": [
"/usr/local/sbin",
"/usr/local/bin",
"/usr/sbin",
"/usr/bin"
],
"pythonexecutable": "/usr/bin/python3.6",
"pythonpath": [
"/usr/bin",
"/usr/lib64/python36.zip",
"/usr/lib64/python3.6",
"/usr/lib64/python3.6/lib-dynload",
"/usr/lib64/python3.6/site-packages",
"/usr/lib/python3.6/site-packages"
],
"pythonversion": [
3,
6,
8,
"final",
0
],
"saltpath": "/usr/lib/python3.6/site-packages/salt",
"saltversion": "3003.3",
"saltversioninfo": [
3003,
3
],
"zmqversion": "4.3.4",
"disks": [
"sr0",
"vda"
],
"ssds": [],
"shell": "/bin/sh",
"lvm": {
"cs": [
"home",
"root",
"swap"
]
},
"mdadm": [],
"username": "root",
"groupname": "root",
"pid": 1278,
"gid": 0,
"uid": 0,
"zfs_support": false,
"zfs_feature_flags": false
}
}

5、获取grains单个key值

1
2
3
4
5
6
7
8
9
10
11
12
13
14
15
16
17
18
19
20
21
22
23
24
25
26
27
28
29
30
31
32
[root@master ~]# salt centos8-1 grains.item ipv4
centos8-1:
----------
ipv4:
- 101.163.9.101
- 127.0.0.1

[root@master ~]# salt centos8-1 grains.item os
centos8-1:
----------
os:
CentOS Stream

[root@master ~]# salt centos8-1 grains.item ip_interfaces
centos8-1:
----------
ip_interfaces:
----------
eth0:
- 101.163.9.101
- fe80::a5cc:3fc5:dc98:8951
- fe80::be6a:c001:7a2a:3f83
- fe80::c612:ca3:b68a:fb31
eth1:
- fe80::d2a2:4115:aaf:204e
eth2:
- fe80::9305:46c4:d68e:be88
eth3:
- fe80::5ae1:82e3:b48a:a3a1
lo:
- 127.0.0.1
- ::1

6、获取grains的列表key的详细值

1
2
3
4
5
6
7
8
9
10
11
12
13
14
15
16
17
18
19
20
21
22
23
24
25
26
27
28
29
30
31
32
[root@master ~]# salt centos8-1 grains.item ip_interfaces:eth0
centos8-1:
----------
ip_interfaces:eth0:
- 101.163.9.101
- fe80::a5cc:3fc5:dc98:8951
- fe80::be6a:c001:7a2a:3f83
- fe80::c612:ca3:b68a:fb31

[root@master ~]# salt centos8-1 grains.item ip_interfaces:eth0:0
centos8-1:
----------
ip_interfaces:eth0:0:
101.163.9.101

[root@master ~]# salt centos8-1 grains.item ip_interfaces:eth0:1
centos8-1:
----------
ip_interfaces:eth0:1:
fe80::a5cc:3fc5:dc98:8951

[root@master ~]# salt centos8-1 grains.item ip_interfaces:eth0:2
centos8-1:
----------
ip_interfaces:eth0:2:
fe80::be6a:c001:7a2a:3f83

[root@master ~]# salt centos8-1 grains.item ip_interfaces:eth0:3
centos8-1:
----------
ip_interfaces:eth0:3:
fe80::c612:ca3:b68a:fb31

7、利用grains匹配操作主机

1
2
3
4
5
6
7
8
9
10
[root@master ~]# salt centos8-1 grains.item os
centos8-1:
----------
os:
CentOS Stream
[root@master ~]# salt ubuntu16-1 grains.item os
ubuntu16-1:
----------
os:
Ubuntu

在理想的情况下,您环境中的每个系统都有一个结构化的名称,它可以告诉,您需要知道的关于硬件、操作系统和系统角色的所有信息。在我们等待这个世界到来的同时, SaltStack提供了一个强大的目标系统,帮助您根据静态和自定义数据查找和过滤系统。

1
2
3
4
5
6
7
8
9
10
11
12
13
14
15
16
17
18
19
20
21
22
23
24
25
26
27
28
29
30
31
32
33
[root@master ~]# salt -G 'os:ubuntu' test.ping
ubuntu16-1:
True

[root@master ~]# salt -G 'os:centos stream' test.ping
centos8-2:
True
centos8-1:
True


[root@master ~]# salt \* grains.item num_cpus
ubuntu16-1:
----------
num_cpus:
2
centos8-2:
----------
num_cpus:
4
centos8-1:
----------
num_cpus:
4

[root@master ~]# salt -G 'num_cpus:4' test.ping
centos8-2:
True
centos8-1:
True
[root@master ~]# salt -G 'num_cpus:2' test.ping
ubuntu16-1:
True

8、通过grains设置状态文件

1
2
3
4
5
6
7
8
9
10
11
12
13
14
15
16
17
18
19
20
21
22
23
24
25
26
27
28
29
30
31
32
33
34
35
[root@master test]# cat web.sls 
{% if grains['os_family'] == 'RedHat' %}
install httpd:
pkg.installed:
- name: httpd
start httpd:
service.running:
- name: httpd
- enable: yes
{% elif grains['os_family'] == 'Debian' %}
install apache2:
pkg.installed:
- name: apache2
start apache:
service.running:
- name: apache2
- enable: yes
{% endif %}

delete default web content:
cmd.run:
- name: "rm -rf /var/www/html/index.html"
set web content:
file.append:
- name: /var/www/html/index.html
- text: "this is a web on {{ grains.os_family }} distribution and the ip is {{ grains.ip_interfaces.eth0.0 }}"

[root@master test]# salt \* state.sls web saltenv='test'

[root@master test]# curl 101.163.9.101
this is a web on RedHat distribution and the ip is 101.163.9.101
[root@master test]# curl 101.163.9.102
this is a web on RedHat distribution and the ip is 101.163.9.102
[root@master test]# curl 101.163.9.103
this is a web on Debian distribution and the ip is 101.163.9.103

9、自定义grains数据

如果你觉得salt minion自带的grains信息不足以满足你的需求,那么你可以自定义。自定义grains分为两种,一种是你在salt master使用函数自定义,另一种方式就是脚本自动化定义。

在master端设置grains的函数是grains.setvals

1
2
3
4
5
6
7
8
9
10
11
12
13
14
15
16
[root@master test]# salt centos8-1 sys.doc grains.setvals
grains.setvals:

Set new grains values in the grains config file

destructive
If an operation results in a key being removed, delete the key, too.
Defaults to False.

refresh_pillar
Whether pillar will be refreshed.
Defaults to True.

CLI Example:

salt '*' grains.setvals "{'key1': 'val1', 'key2': 'val2'}"
1
2
3
4
5
6
7
8
9
10
11
12
13
14
15
16
17
18
19
20
21
22
[root@master test]# salt 'centos8-1' grains.setval role zabbix_server
centos8-1:
----------
role:
zabbix_server
[root@master test]# salt 'centos8-1' grains.setval cpu_info "{"intel","xeon","E5"}"
centos8-1:
----------
cpu_info:
----------
E5:
None
intel:
None
xeon:
None

[root@master test]# salt 'centos8-1' grains.item role
centos8-1:
----------
role:
zabbix_server
1
2
3
4
5
6
7
8
9
10
11
12
13
14
15
16
17
18
19
20
21
22
23
24
25
26
27
28
29
30
31
32
33
34
35
36
37
38
39
40
41
42
43
[root@master ~]# salt centos8-1 grains.item ip_interfaces
centos8-1:
----------
ip_interfaces:
----------
eth0:
- 101.163.9.101
- fe80::a5cc:3fc5:dc98:8951
- fe80::be6a:c001:7a2a:3f83
- fe80::c612:ca3:b68a:fb31
eth1:
- fe80::d2a2:4115:aaf:204e
eth2:
- fe80::9305:46c4:d68e:be88
eth3:
- fe80::5ae1:82e3:b48a:a3a1
lo:
- 127.0.0.1
- ::1

[root@master ~]# salt centos8-1 saltutil.refresh_modules
centos8-1:
True

[root@master ~]# salt centos8-1 grains.item ip_interfaces
centos8-1:
----------
ip_interfaces:
----------
eth0:
- 101.163.9.101
- fe80::a5cc:3fc5:dc98:8951
- fe80::be6a:c001:7a2a:3f83
- fe80::c612:ca3:b68a:fb31
eth1:
- fe80::d2a2:4115:aaf:204e
eth2:
- 1.1.1.1
eth3:
- fe80::5ae1:82e3:b48a:a3a1
lo:
- 127.0.0.1
- ::1

在ansible自定义facts变量的时候,其实自定义的facts变量是存放在被管理主机的/etc/ansible/facts目录下。facts变量文件是以.fact后缀结尾的。

自定义的grains变量存放在/etc/salt/grains

1
2
3
[root@minion1 ~]# cat /etc/salt/grains 
cpu_info: '{intel:AAA,xeon:BBB,E5:CCC}'
role: zabbix_server

1、手工编辑/etc/salt/grains

1
2
3
[root@minion2 ~]# cat /etc/salt/grains 
cpu_info: '{intel:AAA,xeon:BBB,E5:CCC}'
role: zabbix_server

手工编辑的只是保存在硬盘上,并没有写入到内存中,有两种方法加载内存中

1、直接重启salt-minion服务

2、使用saltutil.refresh命令进行刷新

1
2
3
4
5
6
7
8
9
10
11
12
13
14
15
16
17
18
[root@master ~]# salt centos8-2 sys.list_functions saltutil | grep refresh
- saltutil.pillar_refresh
- saltutil.refresh_beacons
- saltutil.refresh_grains
- saltutil.refresh_matchers
- saltutil.refresh_modules
- saltutil.refresh_pillar

[root@master ~]# salt centos8-2 saltutil.refresh_grains
centos8-2:
True

[root@master ~]# salt centos8-2 saltutil.refresh_grains
[root@master ~]# salt centos8-2 grains.item cpu_info
centos8-2:
----------
cpu_info:
{intel:AAA,xeon:BBB,E5:CCC}

2、删除自定义的grains

1、在matser上使用函数

2、手工修改/etc/salt/grains

1
2
3
4
5
6
7
8
9
10
11
12
13
14
15
16
17
18
19
20
21
22
23
24
25
26
27
28
29
30
31
32
33
[root@master ~]# salt centos8-1 grains.delval role
centos8-1:
----------
changes:
----------
role:
None
comment:
result:
True
[root@master ~]# salt centos8-1 grains.item role
centos8-1:
----------
role:
None

#全部删除
[root@master ~]# salt centos8-1 grains.delkey role
centos8-1:
----------
changes:
----------
role:
None
comment:
result:
True
#在minion端上查看
[root@minion1 ~]# cat /etc/salt/grains
cpu_info: '{intel:AAA,xeon:BBB,E5:CCC}'
role: null
[root@minion1 ~]# cat /etc/salt/grains
cpu_info: '{intel:AAA,xeon:BBB,E5:CCC}'

完全可以将这种操作放到状态文件中,直接修改grains文件

10、总结

grains就是我们在salt上设置的变量,是针对每个minion设置的,虽然看起来非常的细化灵活,看起来可以定义每个minion的属性,但是集中化管理程度不够高。想模拟集中化管理,需要对每个minion节点都设置对应的变量。集中化管理的意思是所有节点上的信息都记录在一个位置,集中化管理其实是数据中心里面非常重要的一环。

所以为了弥补minion上grains的问题,salt还支持pillar

11、pillar

1、pillar介绍

pillar是一个定义在全局的变量,并且这个全局的变量是可以分发给指定的minion的,相比于grains,pillar是全局的,grains是局部的,即使将所有的minion设置一样的自定义grains,它也是局部的,pillar相比于grains的定义方式也不同,grains的自定义也是在minion节点上做的,即使在salt master上自定义grains,最终的结果也是将自定义的内容放到minion上,这样很不安全,因为grains这种特性,导致无法将敏感信息通过grains来定义,因为grains是存放在minion上的,如果敏感信息定义在grains上,那么对应的minion被攻击,那么敏感信息就泄露了。

2、pillar定义方法

1、介绍

pillar定义和salt文件定义方法类似,都需要在配置文件中指定位置,所以我们需要修改配置文件,在配置文件中指定pillar的存放位置

2、修改配置文件

1
2
3
4
5
6
7
8
9
10
11
12
13
14
15
16
[root@master prod]# egrep -v '^#|^$' /etc/salt/master
auto_accept: true
file_roots:
base:
- /srv/salt/base
test:
- /srv/salt/test
dev:
- /srv/salt/dev
prod:
- /srv/salt/prod
pillar_roots:
base:
- /srv/pillar

[root@master ~]# systemctl restart salt-master

设置pillarde 存放位置为/srv/pillar,pillar也是分环境的

3、创建/srv/pillar目录

1
[root@master ~]# mkdir /srv/pillar -p

3、定义一个pillar文件

pillar的后缀名也必须是sls

1
2
3
4
[root@master pillar]# cat centos.sls 
web_pkg: httpd
[root@master pillar]# cat ubuntu.sls
web_pkg: apache2

4、pillar文件的top.sls

top.sls是一个特殊的pillar文件,这是salt开发者定义的高级的pillar文件,它是用来分配哪些pillar的变量是应用给哪些主机的。

1
2
3
4
5
6
[root@master pillar]# cat top.sls 
base:
'ubuntu*':
- ubuntu
'centos*':
- centos

base: 表示该部分内容是base环境的定义

‘ubuntu* ’ 表示匹配的主机是ubuntu开头的任意主机

‘- ubuntu’ 表示pillar文件,注意,指定的pillar文件不能携带后缀名

1
2
3
4
5
6
[root@master pillar]# cat centos.sls 
web_pkg: httpd
dhcp_pkg: dhcp-server
[root@master pillar]# cat ubuntu.sls
web_pkg: apache2
dhcp_pkg: isc-dhcp-server

在pillar的base环境下,针对ubuntu名字开头的主机应用ubuntu.sls pillar文件,针对centos名字开头的主机应用centos.sls pillar文件

5、在salt上查看pillar变量

1、查看pillar模块的所有用法

1
2
3
4
5
6
7
8
9
10
11
12
13
14
[root@master pillar]# salt centos8-1 sys.list_functions pillar
centos8-1:
- pillar.data
- pillar.ext
- pillar.fetch
- pillar.file_exists
- pillar.filter_by
- pillar.get
- pillar.item
- pillar.items
- pillar.keys
- pillar.ls
- pillar.obfuscate
- pillar.raw

2、使用pillar函数查看定义的pillar变量

1
2
3
4
5
6
7
8
9
10
11
12
13
14
15
16
17
18
19
20
21
22
23
24
25
26
27
28
29
[root@master pillar]# salt \* pillar.ls
ubuntu16-1:
- dhcp_pkg
- web_pkg
centos8-1:
- web_pkg
- dhcp_pkg
centos8-2:
- web_pkg
- dhcp_pkg
[root@master pillar]# salt \* pillar.items
ubuntu16-1:
----------
dhcp_pkg:
isc-dhcp-server
web_pkg:
apache2
centos8-2:
----------
dhcp_pkg:
dhcp-server
web_pkg:
httpd
centos8-1:
----------
dhcp_pkg:
dhcp-server
web_pkg:
httpd

6、写一个带pillar变量的状态文件

1、创建一个一个名字叫dhcp的状态文件

1
2
3
4
[root@master test]# cat dhcp.sls 
install dhcp server:
pkg.installed:
- name: {{ pillar.dhcp_pkg }}

2、运行dhcp的状态文件

1
2
3
4
5
6
7
8
9
10
11
12
13
14
15
16
17
18
19
20
21
22
23
24
25
26
27
28
29
30
31
32
33
34
35
36
37
38
39
40
41
42
43
44
45
46
47
48
49
50
51
52
53
54
55
[root@master test]# salt \* state.sls dhcp saltenv='test'
ubuntu16-1:
----------
ID: install dhcp server
Function: pkg.installed
Name: isc-dhcp-server
Result: True
Comment: Package isc-dhcp-server is already installed
Started: 08:29:46.221583
Duration: 495.608 ms
Changes:

Summary for ubuntu16-1
------------
Succeeded: 1
Failed: 0
------------
Total states run: 1
Total run time: 495.608 ms
centos8-2:
----------
ID: install dhcp server
Function: pkg.installed
Name: dhcp-server
Result: True
Comment: All specified packages are already installed
Started: 20:29:56.208298
Duration: 1127.254 ms
Changes:

Summary for centos8-2
------------
Succeeded: 1
Failed: 0
------------
Total states run: 1
Total run time: 1.127 s
centos8-1:
----------
ID: install dhcp server
Function: pkg.installed
Name: dhcp-server
Result: True
Comment: All specified packages are already installed
Started: 20:29:56.826723
Duration: 1138.384 ms
Changes:

Summary for centos8-1
------------
Succeeded: 1
Failed: 0
------------
Total states run: 1
Total run time: 1.138 s

7、改造之前写的web.sls状态文件

1、分析

ubuntu的web叫做apache2,centos的web包叫做httpd,ubuntu的web服务叫做apache2,centos的web服务叫做httpd,网页内容的默认位置都是/var/www/html/index

2、修改之前的pillar文件

1
2
3
4
5
6
7
8
9
10
11
12
13
14
[root@master pillar]# cat top.sls 
base:
'ubuntu*':
- ubuntu
'centos*':
- centos
[root@master pillar]# cat centos.sls
web_pkg: httpd
dhcp_pkg: dhcp-server
web_service: httpd
[root@master pillar]# cat ubuntu.sls
web_pkg: apache2
dhcp_pkg: isc-dhcp-server
web_service: apache2

3、修改之前的web.sls状态文件

1
2
3
4
5
6
7
8
9
10
11
12
13
14
15
16
[root@master test]# cat web.sls 
install httpd:
pkg.installed:
- name: {{ pillar.web_pkg }}
start httpd:
service.running:
- name: {{ pillar.web_service }}
- enable: yes

delete default web content:
cmd.run:
- name: "rm -rf /var/www/html/index.html"
set web content:
file.append:
- name: /var/www/html/index.html
- text: "this is a web on {{ grains.os_family }} distribution and the ip is {{ grains.ip_interfaces.eth0.0 }}"

4、运行web.sls状态文件

1
2
3
4
5
6
7
8
9
10
11
12
13
14
15
16
17
18
19
20
21
22
23
24
25
26
27
28
29
30
31
32
33
34
35
36
37
38
39
40
41
42
43
44
45
46
47
48
49
50
51
52
53
54
55
56
57
58
59
60
61
62
63
64
65
66
67
68
69
70
71
72
73
74
75
76
77
78
79
80
81
82
83
84
85
86
87
88
89
90
91
92
93
94
95
96
97
98
99
100
101
102
103
104
105
106
107
108
109
110
111
112
113
114
115
116
117
118
119
120
121
122
123
124
125
126
127
128
129
130
131
132
133
134
135
136
137
138
139
140
141
142
143
144
145
146
147
148
149
150
151
152
153
154
155
156
157
158
159
160
161
162
163
164
165
166
167
168
169
170
171
172
173
174
175
176
177
178
179
180
181
[root@master test]# salt \* state.sls web saltenv='test'
ubuntu16-1:
----------
ID: install httpd
Function: pkg.installed
Name: apache2
Result: True
Comment: Package apache2 is already installed
Started: 10:45:41.890119
Duration: 570.279 ms
Changes:
----------
ID: start httpd
Function: service.running
Name: apache2
Result: True
Comment: The service apache2 is already running
Started: 10:45:42.461032
Duration: 43.154 ms
Changes:
----------
ID: delete default web content
Function: cmd.run
Name: rm -rf /var/www/html/index.html
Result: True
Comment: Command "rm -rf /var/www/html/index.html" run
Started: 10:45:42.505815
Duration: 10.942 ms
Changes:
----------
pid:
32287
retcode:
0
stderr:
stdout:
----------
ID: set web content
Function: file.append
Name: /var/www/html/index.html
Result: True
Comment: Appended 1 lines
Started: 10:45:42.519460
Duration: 3.364 ms
Changes:
----------
diff:
---
+++
@@ -0,0 +1 @@
+this is a web on Debian distribution and the ip is 101.163.9.103

Summary for ubuntu16-1
------------
Succeeded: 4 (changed=2)
Failed: 0
------------
Total states run: 4
Total run time: 627.739 ms
centos8-1:
----------
ID: install httpd
Function: pkg.installed
Name: httpd
Result: True
Comment: All specified packages are already installed
Started: 22:45:52.742388
Duration: 1107.985 ms
Changes:
----------
ID: start httpd
Function: service.running
Name: httpd
Result: True
Comment: The service httpd is already running
Started: 22:45:53.852807
Duration: 70.462 ms
Changes:
----------
ID: delete default web content
Function: cmd.run
Name: rm -rf /var/www/html/index.html
Result: True
Comment: Command "rm -rf /var/www/html/index.html" run
Started: 22:45:53.927266
Duration: 14.162 ms
Changes:
----------
pid:
24596
retcode:
0
stderr:
stdout:
----------
ID: set web content
Function: file.append
Name: /var/www/html/index.html
Result: True
Comment: Appended 1 lines
Started: 22:45:53.946072
Duration: 10.082 ms
Changes:
----------
diff:
---

+++

@@ -0,0 +1 @@

+this is a web on RedHat distribution and the ip is 101.163.9.101

Summary for centos8-1
------------
Succeeded: 4 (changed=2)
Failed: 0
------------
Total states run: 4
Total run time: 1.203 s
centos8-2:
----------
ID: install httpd
Function: pkg.installed
Name: httpd
Result: True
Comment: All specified packages are already installed
Started: 22:45:52.202214
Duration: 1139.872 ms
Changes:
----------
ID: start httpd
Function: service.running
Name: httpd
Result: True
Comment: The service httpd is already running
Started: 22:45:53.344568
Duration: 72.688 ms
Changes:
----------
ID: delete default web content
Function: cmd.run
Name: rm -rf /var/www/html/index.html
Result: True
Comment: Command "rm -rf /var/www/html/index.html" run
Started: 22:45:53.421423
Duration: 15.511 ms
Changes:
----------
pid:
23004
retcode:
0
stderr:
stdout:
----------
ID: set web content
Function: file.append
Name: /var/www/html/index.html
Result: True
Comment: Appended 1 lines
Started: 22:45:53.441032
Duration: 10.71 ms
Changes:
----------
diff:
---

+++

@@ -0,0 +1 @@

+this is a web on RedHat distribution and the ip is 101.163.9.102

Summary for centos8-2
------------
Succeeded: 4 (changed=2)
Failed: 0
------------
Total states run: 4
Total run time: 1.239 s

5、思考

其实pillar和ansible的主机组变量非常像,也是将变量的定义应用到主机或者主机组级别。只不过salt没有主机组的概念,它都是通过通配符或者正则表达式匹配主机。

12、salt的高级状态

1、salt高级状态文件定义

1
高级状态文件相比于低级状态文件,多了主机的定义。其实salt的高级状态文件和ansible的playbook是更加相似的。因为初级的salt状态文件其实并没有针对对主机的定义,只是类似于ansible的task,这些task的执行在哪些主机上执行,完全取决于,你salt命令指定了哪些主机。salt的高级状态名字是top.sls 我们的高级状态文件一般放置在base文件目录下

2、修改salt master的配置文件指定高级状态文件

1
2
3
4
5
6
7
8
9
10
11
12
13
14
15
16
17
[root@master test]# egrep -v '^#|^$' /etc/salt/master
auto_accept: true
state_top: top.sls
file_roots:
base:
- /srv/salt/base
test:
- /srv/salt/test
dev:
- /srv/salt/dev
prod:
- /srv/salt/prod
pillar_roots:
base:
- /srv/pillar

[root@master test]# systemctl restart salt-master

3、写一个高级状态文件top.sls

1、准备初级状态文件

1
2
3
4
5
[root@master base]# pwd
/srv/salt/base
[root@master base]# cat software1.sls
iotop:
pkg.installed
1
2
3
4
5
6
7
8
[root@master test]# pwd
/srv/salt/test
[root@master test]# cat httpd.sls
httpd:
pkg.installed
[root@master test]# cat apache2.sls
apache2:
pkg.installed

2、需求

在ubuntu16-1上部署apache2,在centos8上部署httpd,在所有节点上安装iotop

1
2
3
4
5
6
7
8
9
10
[root@master base]# cat top.sls 
base:
'*':
- software1

test:
'ubuntu*':
- apache2
'centos*':
- httpd

3、执行高级状态文件

1
2
3
4
5
6
7
8
9
10
11
12
13
14
15
16
17
18
19
20
21
22
23
24
25
26
27
28
29
30
31
32
33
34
35
36
37
38
39
40
41
42
43
44
45
46
47
48
49
50
51
52
53
54
55
56
57
58
59
60
61
62
63
64
65
66
67
68
69
70
71
72
73
74
75
76
77
78
79
80
81
82
83
84
85
86
87
88
89
90
91
92
93
94
95
96
97
98
99
100
101
102
103
104
105
106
107
108
109
110
111
112
113
114
115
116
117
118
119
120
121
[root@master base]# salt centos8-1 sys.list_functions state 
centos8-1:
- state.apply
- state.check_request
- state.clear_cache
- state.clear_request
- state.disable
- state.enable
- state.event
- state.get_pauses
- state.high
- state.highstate
- state.id_exists
- state.list_disabled
- state.low
- state.orchestrate
- state.pause
- state.pkg
- state.request
- state.resume
- state.run_request
- state.running
- state.show_highstate
- state.show_low_sls
- state.show_lowstate
- state.show_sls
- state.show_state_usage
- state.show_states
- state.show_top
- state.single
- state.sls
- state.sls_exists
- state.sls_id
- state.soft_kill
- state.template
- state.template_str
- state.test
- state.top

[root@master base]# salt \* state.apply
centos8-1:
----------
ID: iotop
Function: pkg.installed
Result: True
Comment: All specified packages are already installed
Started: 21:06:25.249258
Duration: 1175.793 ms
Changes:
----------
ID: httpd
Function: pkg.installed
Result: True
Comment: All specified packages are already installed
Started: 21:06:26.425345
Duration: 26.173 ms
Changes:

Summary for centos8-1
------------
Succeeded: 2
Failed: 0
------------
Total states run: 2
Total run time: 1.202 s
centos8-2:
----------
ID: iotop
Function: pkg.installed
Result: True
Comment: All specified packages are already installed
Started: 21:06:24.768413
Duration: 1115.826 ms
Changes:
----------
ID: httpd
Function: pkg.installed
Result: True
Comment: All specified packages are already installed
Started: 21:06:25.884541
Duration: 25.372 ms
Changes:

Summary for centos8-2
------------
Succeeded: 2
Failed: 0
------------
Total states run: 2
Total run time: 1.141 s
ubuntu16-1:
----------
ID: apache2
Function: pkg.installed
Result: True
Comment: Package apache2 is already installed
Started: 09:05:56.627912
Duration: 549.778 ms
Changes:
----------
ID: iotop
Function: pkg.installed
Result: True
Comment: The following packages were installed/updated: iotop
Started: 09:05:57.177860
Duration: 9694.446 ms
Changes:
----------
iotop:
----------
new:
0.6-1
old:

Summary for ubuntu16-1
------------
Succeeded: 2 (changed=1)
Failed: 0
------------
Total states run: 2
Total run time: 10.244 s

高级状态文件就是将初级状态文件组合起来应用到指定的主机。

采用了高级状态文件之后,你可以最大限度的重用你的初级状态文件。

salt的架构先天将状态文件(对应ansible的task)。pillar变量文件(对应ansible的主机变量和主机组变量),各种环境下的模板文件(和ansible一样)进行结藕,其实这就是ansible的role。

13、zabbix的组件分离运维实战

1、拓扑

image-20210930153348065

2、在所有的zabbix主机里部署salt-minion

1
2
3
4
5
6
7
8
9
10
11
12
13
14
15
16
17
18
19
20
21
22
23
24
25
26
[root@master ~]# cat salt-install-minion.sh 
#!/bin/bash
sshpass -p1 ssh-copy-id $1
ssh $1 rm -rf /etc/yum.repos.d/*
ssh $1 'cat > /etc/yum.repos.d/a.repo <<END
[BaseOS]
name=baseos
baseurl=https://mirrors.tuna.tsinghua.edu.cn/centos/8/BaseOS/x86_64/os/
gpgcheck=0
enabled=1
[AppStream]
name=AppStream
baseurl=https://mirrors.tuna.tsinghua.edu.cn/centos/8/AppStream/x86_64/os/
gpgcheck=0
enabled=1
[epel]
name=epel
baseurl=https://mirrors.tuna.tsinghua.edu.cn/epel/8/Everything/x86_64/
gpgcheck=0
enabled=1
END'
ssh $1 'sudo rpm --import https://repo.saltproject.io/py3/redhat/8/x86_64/latest/SALTSTACK-GPG-KEY.pub'
ssh $1 'curl -fsSL https://repo.saltproject.io/py3/redhat/8/x86_64/latest.repo | sudo tee /etc/yum.repos.d/salt.repo'
ssh $1 'yum install salt-minion -y'
ssh $1 'echo "10.163.9.100 salt" >> /etc/hosts'
ssh $1 systemctl enable salt-minion --now

3、编写pillar文件

在zabbix-server部署时需要指定zabbix-db的IP地址,需要定义pillar变量指定zabbix-db的ip地址是多少,方便配置文件模板可以轻松引用变量。

1
2
3
4
5
6
7
8
9
10
11
12
13
14
15
16
17
18
19
20
21
22
23
24
25
26
27
28
29
30
31
32
33
34
35
36
37
38
39
40
41
42
43
44
45
46
47
48
49
50
51
52
53
54
55
56
57
58
59
60
61
62
[root@master ~]# egrep -v '^#|^$' /etc/salt/master
auto_accept: true
state_top: top.sls
file_roots:
base:
- /srv/salt/base
test:
- /srv/salt/test
dev:
- /srv/salt/dev
prod:
- /srv/salt/prod
pillar_roots:
base:
- /srv/pillar

[root@master pillar]# cat zabbix.sls
zabbix_db_ip: 101.163.9.104
zabbix_db_name: zabbix
zabbix_db_user: zabbix
zabbix_db_password: zabbix

[root@master pillar]# cat top.sls
base:
'ubuntu*':
- ubuntu
'centos*':
- centos
'zabbix*':
- zabbix

[root@master pillar]# salt 'zabbix*' pillar.items
zabbix-server:
----------
zabbix_db_ip:
101.163.9.104
zabbix_db_name:
zabbix
zabbix_db_password:
zabbix
zabbix_db_user:
zabbix
zabbix-db:
----------
zabbix_db_ip:
101.163.9.104
zabbix_db_name:
zabbix
zabbix_db_password:
zabbix
zabbix_db_user:
zabbix
zabbix-web:
----------
zabbix_db_ip:
101.163.9.104
zabbix_db_name:
zabbix
zabbix_db_password:
zabbix
zabbix_db_user:
zabbix

4、编写状态文件

1
2
3
4
5
6
7
8
9
10
11
12
13
14
15
16
17
18
19
20
21
22
23
24
25
26
27
28
29
30
31
32
33
34
35
36
37
38
39
40
41
42
43
44
45
46
47
48
49
50
51
52
53
54
55
56
57
58
59
60
61
62
63
64
65
66
67
68
69
70
71
72
73
74
75
76
77
78
79
80
81
82
83
84
85
86
87
88
89
90
91
[root@master prod]# cat zabbix-allinone.sls 
disable selinux:
selinux.mode:
- name: permissive
disbale firewalld:
service.dead:
- name: firewalld
- enable: no
copy zabbix repo:
file.managed:
- name: /etc/yum.repos.d/zabbix.repo
- source: salt://zabbix.repo
install all pkgs for zabbix:
pkg.installed:
- pkgs:
- mariadb-server
- zabbix-server-mysql
- python3-PyMySQL
- zabbix-web-mysql
- zabbix-nginx-conf
start mariadb service:
service.running:
- name: mariadb
- enable: yes
create a database for zabbix:
mysql_database.present:
- name: zabbix
- character_set: utf8
- collate: utf8_bin
create a local zabbix user:
mysql_user.present:
- name: zabbix
- host: 'localhost'
- password: zabbix
create a zabbix user:
mysql_user.present:
- name: zabbix
- host: '%'
- password: zabbix
grant some privileges for local zabbix user:
mysql_grants.present:
- name: zabbix
- grant: all privileges
- database: zabbix.*
- user: zabbix
- host: 'localhost'
grant some privileges for remote zabbix user:
mysql_grants.present:
- name: zabbix
- grant: all privileges
- database: zabbix.*
- user: zabbix
- host: '%'
import zabbix db:
cmd.run:
- name: 'zcat /usr/share/doc/zabbix-server-mysql/create.sql.gz | mysql -uzabbix -pzabbix zabbix'
- onchanges:
- create a database for zabbix
- require:
- create a database for zabbix
set zabbix server cfg:
file.managed:
- source: salt://template/zabbix_server.conf.j2
- name: /etc/zabbix/zabbix_server.conf
- mode: 777
- template: jinja
- defaults:
zabbix_db_ip: 101.163.9.102
zabbix_db_name: zabbix
zabbix_db_user: zabbix
zabbix_db_password: zabbix
set zabbix nginx cfg:
file.managed:
- source: salt://template/zabbix-nginx.conf.j2
- name: /etc/nginx/conf.d/zabbix.conf
- mode: 644
- template: jinja
set zabbix php cfg:
file.managed:
- source: salt://template/zabbix-php.conf.j2
- name: /etc/php-fpm.d/zabbix.conf
- mode: 644
- template: jinja
start nginx service:
service.running:
- name: nginx
- enbale: yes
start php service:
service.running:
- name: php-fpm
- enable: yes