Ingress Controller

1、Ingress-Controller高可用

Ingress Controller是集群流量的接入层,对它做高可用非常重要,可以基于keepalive实现nginx-ingress-controller高可用,具体实现如下:

Ingress-controller根据Deployment+ nodeSeletor+pod反亲和性方式部署在k8s指定的两个work节点,nginx-ingress-controller这个pod共享宿主机ip,然后通过keepalive+lvs实现nginx-ingress-controller高可用

1
2
https://github.com/kubernetes/ingress-nginx
https://github.com/kubernetes/ingress-nginx/tree/main/deploy/static/provider/baremetal

image-20220903145934831

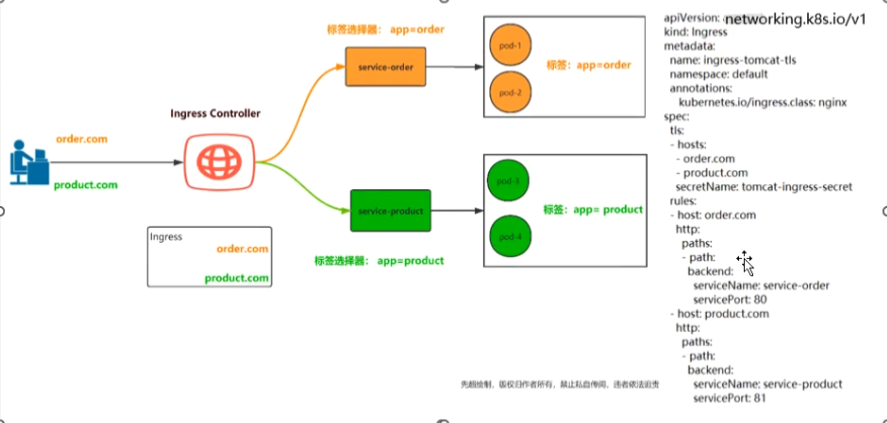
Ingree Controller 控制器,它通过不断的跟kubernetes API交互,实时获取后端Service、Pod的变化,比如新增、删除等,结合Ingree定义的规则生成配置,然后动态更新上面的Nginx或者trafik负载均衡器,并刷新使配置生效,来达到服务自动发现的作用。

Ingress则是定义规则,通过它定义某个域名的请求过来之后转发到集群中指定的Service。它可以通过yaml文件定义,给一个或者多个service定义和一个或者多个Ingress规则

Ingress Controller代理流程

1、部署Ingress controller(nginx)

2、创建pod应用,通过控制器创建pod

3、创建service,用来分组pod

4、创建Ingress http,测试通过http访问应用

5、创建Ingress https,测试通过https访问应用

1、通过nginx与keepalived实现nginx-ingress-controller高可用

1、在node节点上打上标签

1
2
3
4
5
6
[root@master1 ~]# kubectl label nodes node1 kubernetes.io/ingress=nginx
node/node1 labeled
[root@master1 ~]# kubectl label nodes node2 kubernetes.io/ingress=nginx
node/node2 labeled
[root@master1 ~]# kubectl label nodes node3 kubernetes.io/ingress=nginx
node/node3 labeled

2、在node节点导入所需镜像

1
2
docker load -i kube-webhook-certgen-v1.1.0.tar.gz 
docker load -i ingress-nginx-controllerv1.1.0.tar.gz

3、创建pod

1
2
3
4
5
6
7
8
9
10
[root@master1 ~]# kubectl apply -f ingress-deploy.yaml 


[root@master1 ~]# kubectl get pods -n ingress-nginx -owide
NAME READY STATUS RESTARTS AGE IP NODE NOMINATED NODE READINESS GATES
ingress-nginx-admission-create-fz58k 0/1 Completed 0 74s 172.16.135.32 node3 <none> <none>
ingress-nginx-admission-patch-d9vj6 0/1 Completed 1 74s 172.16.166.188 node1 <none> <none>
ingress-nginx-controller-6c8ffbbfcf-dm5pn 1/1 Running 0 75s 192.168.106.22 node2 <none> <none>
ingress-nginx-controller-6c8ffbbfcf-g5p7v 1/1 Running 0 75s 192.168.106.23 node3 <none> <none>
ingress-nginx-controller-6c8ffbbfcf-n7dgx 1/1 Running 0 75s 192.168.106.21 node1 <none> <none>

4、在node1与node2节点上安装nginx与keepalive

1
2
3
4
[root@node1 ~]# yum install keepalived nginx nginx-mod-stream -y


[root@node2 ~]# yum install keepalived nginx nginx-mod-stream -y

5、更改nginx配置文件(node1与node2节点一致)

1
2
3
4
5
6
7
8
9
10
11
12
13
14
15
16
17
18
19
20
21
22
23
24
25
26
27
28
29
30
31
32
33
34
35
36
37
38
39
40
41
42
43
44
45
46
user nginx;
worker_processes auto;
error_log /var/log/nginx/error.log;
pid /run/nginx.pid;

include /usr/share/nginx/modules/*.conf;

events {
worker_connections 1024;
}

# 四层负载均衡,为两台Master apiserver组件提供负载均衡
stream {

log_format main '$remote_addr $upstream_addr - [$time_local] $status $upstream_bytes_sent';

access_log /var/log/nginx/k8s-access.log main;

upstream k8s-apiserver {
server 192.168.106.11:80; # Master1 APISERVER IP:PORT
server 192.168.106.12:80; # Master2 APISERVER IP:PORT
}

server {
listen 30080;
proxy_pass k8s-apiserver;
}
}

http {
log_format main '$remote_addr - $remote_user [$time_local] "$request" '
'$status $body_bytes_sent "$http_referer" '
'"$http_user_agent" "$http_x_forwarded_for"';

access_log /var/log/nginx/access.log main;

sendfile on;
tcp_nopush on;
tcp_nodelay on;
keepalive_timeout 65;
types_hash_max_size 2048;

include /etc/nginx/mime.types;
default_type application/octet-stream;

}

6、配置keepalived主备配置文件

主:

1
2
3
4
5
6
7
8
9
10
11
12
13
14
15
16
17
18
19
20
21
22
23
24
25
26
27
28
29
30
31
32
33
34
35
36
37
global_defs { 
notification_email {
[email protected]
[email protected]
[email protected]
}
notification_email_from [email protected]
smtp_server 127.0.0.1
smtp_connect_timeout 30
router_id NGINX_MASTER
}

vrrp_script check_nginx {
script "/etc/keepalived/check_nginx.sh"
}

vrrp_instance VI_1 {
state MASTER
interface ens0 # 修改为实际网卡名
virtual_router_id 51 # VRRP 路由 ID实例,每个实例是唯一的
priority 100 # 优先级,备服务器设置 90
advert_int 1 # 指定VRRP 心跳包通告间隔时间,默认1秒
authentication {
auth_type PASS
auth_pass 1111
}
# 虚拟IP
virtual_ipaddress {
192.168.100.199/24
}
track_script {
check_nginx
}
}

#vrrp_script:指定检查nginx工作状态脚本(根据nginx状态判断是否故障转移)
#virtual_ipaddress:虚拟IP(VIP)

备:

1
2
3
4
5
6
7
8
9
10
11
12
13
14
15
16
17
18
19
20
21
22
23
24
25
26
27
28
29
30
31
32
33
global_defs { 
notification_email {
[email protected]
[email protected]
[email protected]
}
notification_email_from [email protected]
smtp_server 127.0.0.1
smtp_connect_timeout 30
router_id NGINX_BACKUP
}

vrrp_script check_nginx {
script "/etc/keepalived/check_nginx.sh"
}

vrrp_instance VI_1 {
state BACKUP
interface ens160
virtual_router_id 51 # VRRP 路由 ID实例,每个实例是唯一的
priority 90
advert_int 1
authentication {
auth_type PASS
auth_pass 1111
}
virtual_ipaddress {
192.168.100.199/24
}
track_script {
check_nginx
}
}

7、check_nginx

1
2
3
4
5
6
7
8
9
10
11
12
13
cat > /etc/keepalived/check_nginx.sh <<END
#!/bin/bash
counter=\`netstat -tunpl | grep nginx | wc -l\`
if [ \$counter -eq 0 ]; then
service nginx start
sleep 2
counter=\`netstat -tunpl | grep nginx | wc -l\`
if [ \$counter -eq 0 ]; then
service keepalived stop
fi
fi
END
chmod +x /etc/keepalived/check_nginx.sh

8、创建ingress-deploy.yaml

1
2
3
4
5
6
7
8
9
[root@master1 ~]# kubectl apply -f ingress-deploy.yaml


[root@master1 ~]# kubectl get pods -n ingress-nginx -owide
NAME READY STATUS RESTARTS AGE IP NODE NOMINATED NODE READINESS GATES
ingress-nginx-admission-create-5d848 0/1 Completed 0 80s 10.244.104.9 node2 <none> <none>
ingress-nginx-admission-patch-vk8j5 0/1 Completed 1 80s 10.244.166.148 node1 <none> <none>
ingress-nginx-controller-6c8ffbbfcf-lrgsx 1/1 Running 0 81s 192.168.100.22 node2 <none> <none>
ingress-nginx-controller-6c8ffbbfcf-x694r 1/1 Running 0 81s 192.168.100.21 node1 <none> <none>

9、通过keepalived+nginx实现nginx-ingress-controller高可用

1
2
3
#参数true表示共享宿主机ip
[root@master1 ~]# grep -i hostnetwork ingress-deploy.yaml
hostNetwork: true

10、测试ingress HTTP代理k8s内部站点

1、编写tomcat-service文件

1
2
3
4
5
6
7
8
9
10
11
12
13
14
15
16
17
[root@master1 ingress]# cat tomcat_svc.yml 
apiVersion: v1
kind: Service
metadata:
name: tomcat
namespace: default
spec:
selector:
app: tomcat
release: canary
ports:
- name: http
targetPort: 8080
port: 8080
- name: ajp
targetPort: 8009
port: 8009

2、编写tomcat-pod文件

1
2
3
4
5
6
7
8
9
10
11
12
13
14
15
16
17
18
19
20
21
22
23
24
25
26
27
[root@master1 ingress]# cat tomcat_pod.yml 
apiVersion: apps/v1
kind: Deployment
metadata:
name: tomcat-deploy
namespace: default
spec:
replicas: 2
selector:
matchLabels:
app: tomcat
release: canary
template:
metadata:
labels:
app: tomcat
release: canary
spec:
containers:
- name: tomcat
image: tomcat:8.5.34-jre8-alpine
imagePullPolicy: IfNotPresent
ports:
- name: http
containerPort: 8080
- name: ajp
containerPort: 8009

3、编写Ingress文件

1
2
3
4
5
6
7
8
9
10
11
12
13
14
15
16
17
18
19
20
[root@master1 ingress]# cat ingress-myapp.yml 
apiVersion: networking.k8s.io/v1
kind: Ingress
metadata:
name: ingress-myapp
namespace: default
annotations:
kubernetes.io/ingress.class: "nginx"
spec:
rules:
- host: tomcat.zy.com
http:
paths:
- path: /
pathType: Prefix
backend:
service:
name: tomcat
port:
number: 8080

4、测试是否七层代理成功

通过deployment+nodeSelector+pod反亲和性实现ingress-controller在onode1和onode2调度

1
2
3
4
5
79254@ZY C:\Users\79254>curl tomcat.zy.com -I 
HTTP/1.1 200
Date: Tue, 06 Sep 2022 10:59:58 GMT
Content-Type: text/html;charset=UTF-8
Connection: keep-alive

2、同一个k8s搭建多套ingress-controller

ingress可以简单理解为service的service,它通过独立的ingress对象来制定请求转发的规则,把请求路由到一个或多个service中。这样就把服务与请求规则解耦了,可以从业务维度统一考虑业务的暴露,而不用为每个service单独考虑。

在同一个k8s集群里,部署两个ingress nginx。一个deploy部署给A的API网关项目用。另一个daemonset部署给其它项目作域名访问用。这两个项目的更新频率和用法不一致,暂时不用合成一个。

为了满足多租户场景,需要在k8s集群部署多个ingress-controller,给不同用户不同环境使用。

主要参数设置:

1
2
3
4
5
6
containers:
- name: nginx-ingress-controller
image: registry.cn-hangzhou.aliyuncs.com/google_containers/nginx-ingress-controller:v1.1.0
args:
- /nginx-ingress-controller
- --ingress-class=ngx-ds

注意:–ingress-class设置该Ingress Controller可监听的目标Ingress Class标识;注意:同一个集群中不同套Ingress Controller监听的Ingress Class标识必须唯一,且不能设置为nginx关键字(其是集群默认Ingress Controller的监听标识);

创建Ingress规则:

1
2
3
4
5
6
7
8
9
10
11
12
13
14
15
16
17
18
19
20
21
22
23
24
apiVersion: networking.k8s.io/v1
kind: Ingress
metadata:
name: ingress-myapp
namespace: default
annotations:
kubernetes.io/ingress.class: "ngx-ds"
spec:
rules:
- host: tomcat.lucky.com
http:
paths:
- path: /
pathType: Prefix
backend:
service:
name: tomcat
port:
number: 8080

annotations:
# 注意:这里要设置为你前面配置的`controller.ingressClass`唯一标识
annotations:
kubernetes.io/ingress.class: "ngx-ds"

2、通过Ingress-nginx实现灰度发布

1、将新版本灰度给部分用户

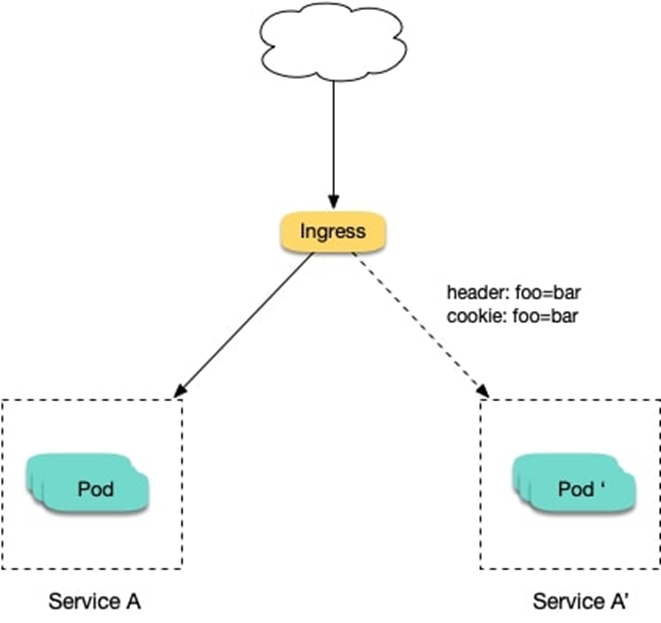
假设线上运行了一套对外提供 7 层服务的 Service A 服务,后来开发了个新版本 Service A想要上线,但又不想直接替换掉原来的 Service A,希望先灰度一小部分用户,等运行一段时间足够稳定了再逐渐全量上线新版本,最后平滑下线旧版本。这个时候就可以利用 Nginx Ingress 基于 Header 或 Cookie 进行流量切分的策略来发布,业务使用 Header 或 Cookie 来标识不同类型的用户,我们通过配置 Ingress 来实现让带有指定 Header 或 Cookie 的请求被转发到新版本,其它的仍然转发到旧版本,从而实现将新版本灰度给部分用户:

image-20220906222908065

2、切一定比例的流量给新版本

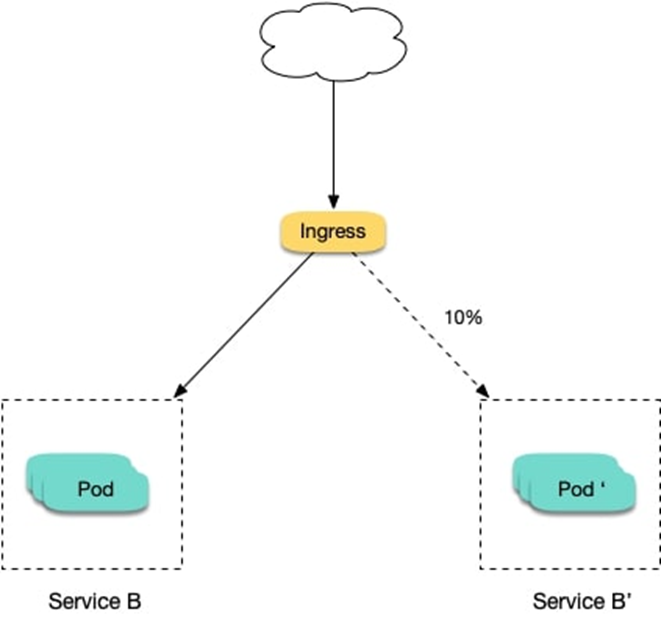
假设线上运行了一套对外提供 7 层服务的 Service B 服务,后来修复了一些问题,需要灰度上线一个新版本 Service B,但又不想直接替换掉原来的 Service B,而是让先切 10% 的流量到新版本,等观察一段时间稳定后再逐渐加大新版本的流量比例直至完全替换旧版本,最后再滑下线旧版本,从而实现切一定比例的流量给新版本:

image-20220906223106860

Ingress-Nginx是一个K8S ingress工具,支持配置Ingress Annotations来实现不同场景下的灰度发布和测试。 Nginx Annotations 支持以下几种Canary规则:

假设我们现在部署了两个版本的服务,老版本和canary版本

nginx.ingress.kubernetes.io/canary-by-header

基于Request Header的流量切分,适用于灰度发布以及 A/B 测试。当Request Header 设置为 always时,请求将会被一直发送到 Canary 版本;当 Request Header 设置为 never时,请求不会被发送到 Canary 入口。

nginx.ingress.kubernetes.io/canary-by-header-value

要匹配的 Request Header 的值,用于通知 Ingress 将请求路由到 Canary Ingress 中指定的服务。当 Request Header 设置为此值时,它将被路由到 Canary 入口。

nginx.ingress.kubernetes.io/canary-weight

基于服务权重的流量切分,适用于蓝绿部署,权重范围 0 - 100 按百分比将请求路由到 Canary Ingress 中指定的服务。权重为 0 意味着该金丝雀规则不会向 Canary 入口的服务发送任何请求。权重为60意味着60%流量转到canary。权重为 100 意味着所有请求都将被发送到 Canary 入口。

基于 Cookie 的流量切分,适用于灰度发布与 A/B 测试。用于通知 Ingress 将请求路由到 Canary Ingress 中指定的服务的cookie。当 cookie 值设置为 always时,它将被路由到 Canary 入口;当 cookie 值设置为 never时,请求不会被发送到 Canary 入口。

3、模拟部署生产测试版本web服务

1、部署v1版本

1
2
3
4
5
6
7
8
9
10
11
12
13
14
15
16
17
18
19
20
21
22
23
24
25
26
27
28
29
30
31
32
33
34
35
36
37
38
39
40
41
42
43
44
45
46
47
48
49
50
51
52
53
54
55
56
57
58
59
60
61
62
63
64
65
66
67
68
69
70
71
72
73
74
75
76
77
[root@master1 deploy_web]# cat v1.yml 
apiVersion: apps/v1
kind: Deployment
metadata:
name: nginx-v1
spec:
replicas: 1
selector:
matchLabels:
app: nginx
version: v1
template:
metadata:
labels:
app: nginx
version: v1
spec:
containers:
- name: nginx
image: "openresty/openresty:centos"
imagePullPolicy: IfNotPresent
ports:
- name: http
protocol: TCP
containerPort: 80
volumeMounts:
- name: config
mountPath: /usr/local/openresty/nginx/conf/nginx.conf
subPath: nginx.conf
volumes:
- name: config
configMap:
name: nginx-v1

---
apiVersion: v1
kind: ConfigMap
metadata:
name: nginx-v1
labels:
app: nginx
version: v1
data:
nginx.conf: |
worker_processes 1;
events {
accept_mutex on;
multi_accept on;
use epoll;
worker_connections 1024;
}
http {
ignore_invalid_headers off;
server {
listen 80;
location / {
access_by_lua '
local header_str = ngx.say("nginx-v1")
';
}
}
}

---
apiVersion: v1
kind: Service
metadata:
name: nginx-v1
spec:
type: ClusterIP
ports:
- port: 80
protocol: TCP
name: http
selector:
app: nginx
version: v1

2、部署v2版本

1
2
3
4
5
6
7
8
9
10
11
12
13
14
15
16
17
18
19
20
21
22
23
24
25
26
27
28
29
30
31
32
33
34
35
36
37
38
39
40
41
42
43
44
45
46
47
48
49
50
51
52
53
54
55
56
57
58
59
60
61
62
63
64
65
66
67
68
69
70
71
72
73
74
75
76
77
[root@master1 deploy_web]# cat v2.yml 
apiVersion: apps/v1
kind: Deployment
metadata:
name: nginx-v2
spec:
replicas: 1
selector:
matchLabels:
app: nginx
version: v2
template:
metadata:
labels:
app: nginx
version: v2
spec:
containers:
- name: nginx
image: "openresty/openresty:centos"
imagePullPolicy: IfNotPresent
ports:
- name: http
protocol: TCP
containerPort: 80
volumeMounts:
- name: config
mountPath: /usr/local/openresty/nginx/conf/nginx.conf
subPath: nginx.conf
volumes:
- name: config
configMap:
name: nginx-v2

---
apiVersion: v1
kind: ConfigMap
metadata:
name: nginx-v2
labels:
app: nginx
version: v2
data:
nginx.conf: |
worker_processes 1;
events {
accept_mutex on;
multi_accept on;
use epoll;
worker_connections 1024;
}
http {
ignore_invalid_headers off;
server {
listen 80;
location / {
access_by_lua '
local header_str = ngx.say("nginx-v2")
';
}
}
}

---
apiVersion: v1
kind: Service
metadata:
name: nginx-v2
spec:
type: ClusterIP
ports:
- port: 80
protocol: TCP
name: http
selector:
app: nginx
version: v2

3、创建一个ingress,对外暴漏服务,指向v1版本的服务

1
2
3
4
5
6
7
8
9
10
11
12
13
14
15
16
17
18
19
[root@master1 deploy_web]# cat v1-ingress.yml 
apiVersion: networking.k8s.io/v1
kind: Ingress
metadata:
name: nginx
annotations:
kubernetes.io/ingress.class: "nginx"
spec:
rules:
- host: canary.example.com
http:
paths:
- backend:
service:
name: nginx-v1
port:
number: 80
path: /
pathType: Prefix

4、访问验证ingress

1
2
[root@master1 deploy_web]# curl -H "Host: canary.example.com" http://192.168.106.199
nginx-v1

5、基于Header的流量切分

创建 Canary Ingress,指定 v2 版本的后端服务,且加上一些 annotation,实现仅将带有名为 Region 且值为 cd 或 sz 的请求头的请求转发给当前 Canary Ingress,模拟灰度新版本给成都和深圳地域的用户:

1
2
3
4
5
6
7
8
9
10
11
12
13
14
15
16
17
18
19
20
21
22
23
24
25
26
27
28
29
30
[root@master1 deploy_web]# cat v2-ingress.yml 
apiVersion: networking.k8s.io/v1
kind: Ingress
metadata:
annotations:
kubernetes.io/ingress.class: nginx
nginx.ingress.kubernetes.io/canary: "true"
nginx.ingress.kubernetes.io/canary-by-header: "Region"
nginx.ingress.kubernetes.io/canary-by-header-pattern: "cd|sz"
name: nginx-canary
spec:
rules:
- host: canary.example.com
http:
paths:
- backend:
service:
name: nginx-v2
port:
number: 80
path: /
pathType: Prefix


#测试流量的访问情况
[root@master1 deploy_web]# curl -H "HOST: canary.example.com " -H "Region: cd" http://192.168.106.199
nginx-v2

[root@master1 deploy_web]# curl -H "HOST: canary.example.com " -H "Region: sz" http://192.168.106.199
nginx-v2

与前面 Header 类似,不过使用 Cookie 就无法自定义 value 了,这里以模拟灰度成都地域用户为例,仅将带有名为 user_from_cd 的 cookie 的请求转发给当前 Canary Ingress 。

1
2
3
4
5
6
7
8
9
10
11
12
13
14
15
16
17
18
19
20
21
22
23
24
25
26
27
28
29
[root@master1 deploy_web]# cat  v2_ingress_cookie.yml 
apiVersion: networking.k8s.io/v1
kind: Ingress
metadata:
annotations:
kubernetes.io/ingress.class: nginx
nginx.ingress.kubernetes.io/canary: "true"
nginx.ingress.kubernetes.io/canary-by-cookie: "user_from_cd"
name: nginx-canary
spec:
rules:
- host: canary.example.com
http:
paths:
- backend:
service:
name: nginx-v2
port:
number: 80
path: /
pathType: Prefix


#测试流量的访问情况
[root@master1 deploy_web]# curl -s -H "HOST: canary.example.com" --cookie "user_from_cd=always" http://192.168.106.199
nginx-v2

[root@master1 deploy_web]# curl -s -H "HOST: canary.example.com" http://192.168.106.199nginx-v1

7、基于服务权重的流量切分

基于服务权重的 Canary Ingress 就简单了,直接定义需要导入的流量比例,这里以导入 10% 流量到 v2 版本为例

1
2
3
4
5
6
7
8
9
10
11
12
13
14
15
16
17
18
19
20
21
22
23
24
25
26
27
28
29
30
31
32
33
34
35
[root@master1 deploy_web]# cat v2_ingress_weight.yml 
apiVersion: networking.k8s.io/v1
kind: Ingress
metadata:
annotations:
kubernetes.io/ingress.class: nginx
nginx.ingress.kubernetes.io/canary: "true"
nginx.ingress.kubernetes.io/canary-weight: "10"
name: nginx-canary
spec:
rules:
- host: canary.example.com
http:
paths:
- backend:
service:
name: nginx-v2
port:
number: 80
path: /
pathType: Prefix


#测试流量的访问情况
[root@master1 deploy_web]# for i in {1..10}; do curl -H "HOST: canary.example.com" http://192.168.106.199 ;done
nginx-v1
nginx-v1
nginx-v1
nginx-v1
nginx-v2
nginx-v1
nginx-v1
nginx-v1
nginx-v1
nginx-v1

本博客所有文章除特别声明外,均采用 CC BY-SA 4.0 协议 ,转载请注明出处!