CKA-考题

1、基于角色的RBAC控制

image-20221106114527207

Context:

您已经被要求为部署管道创建一个新的ClusterRole,并将其绑定到特定namespace内的特定ServiceAccount。

Task:

创建一个新的名为deployment-clusterrole的ClusterRole,它只允许创建以下资源类型:

Deployment

StatefulSet

DaemonSet

在现有的名称空间app-team1中创建一个名为cicd-token的新ServiceAccount

将新的ClusterRole deployment-clusterrole绑定到新的ServiceAccount cicd-token中,仅限于命名空间app-team1

1
2
3
4
5
6
7
8
9
10
11
12
13
14
15
16
17
18
19
root@master1:~# kubectl config use-context k8s
root@master1:~# kubectl create ns app-team1
root@master1:~# kubectl create clusterrole deployment-clusterrole --verb=create --resource=deployment,statefulsets,daemonsets
root@master1:~# kubectl create sa cicd-token -n app-team1
root@master1:~# kubectl create rolebinding cicd-token-binding --clusterrole=deployment-clusterrole --serviceaccount=app-team1:cicd-token -n app-team1


#进行验证
root@master1:~# kubectl describe rolebinding -n app-team1
Name: cicd-token-binding
Labels: <none>
Annotations: <none>
Role:
Kind: ClusterRole
Name: deployment-clusterrole
Subjects:
Kind Name Namespace
---- ---- ---------
ServiceAccount cicd-token app-team1

2、节点维护:指定节点不可用

在官网文档搜索Safely Drain a Node

image-20221106123700099

中文翻译:

将ek8s-node-1节点设置为不可用,然后重新调度该节点上的所有的pod

1
2
3
4
5
6
7
8
9
10
11
12
13
14
15
16
17
18
19
20
21
root@master1:~# kubectl config use-context ek8s

#设置节点为不可被调度状态
root@master1:~# kubectl cordon node1
root@master1:~# kubectl drain node1 --delete-emptydir-data --ignore-daemonsets --force


#验证
root@master1:~# kubectl get pods -owide -n kube-system
NAME READY STATUS RESTARTS AGE IP NODE NOMINATED NODE READINESS GATES
calico-kube-controllers-677cd97c8d-7xzrk 1/1 Running 0 2m19s 10.244.137.71 master1 <none> <none>
calico-node-57lnd 1/1 Running 2 (75m ago) 15h 192.168.100.131 node1 <none> <none>
calico-node-zwmqq 1/1 Running 2 (75m ago) 15h 192.168.100.130 master1 <none> <none>
coredns-65c54cc984-lxgmv 1/1 Running 2 (75m ago) 16h 10.244.137.69 master1 <none> <none>
coredns-65c54cc984-sldrd 1/1 Running 2 (75m ago) 16h 10.244.137.70 master1 <none> <none>
etcd-master1 1/1 Running 3 (75m ago) 16h 192.168.100.130 master1 <none> <none>
kube-apiserver-master1 1/1 Running 2 (75m ago) 16h 192.168.100.130 master1 <none> <none>
kube-controller-manager-master1 1/1 Running 2 (75m ago) 16h 192.168.100.130 master1 <none> <none>
kube-proxy-2vgjf 1/1 Running 2 (75m ago) 15h 192.168.100.131 node1 <none> <none>
kube-proxy-7cz5z 1/1 Running 2 (75m ago) 16h 192.168.100.130 master1 <none> <none>
kube-scheduler-master1 1/1 Running 2 (75m ago) 16h 192.168.100.130 master1 <none> <none>

3、k8s版本升级

官网搜索kubeadm upgrade,考试是从1.23升级到1.24

image-20221106125743609

1
2
3
4
5
6
7
8
9
10
11
12
13
14
15
16
17
18
19
20
21
22
23
24
25
26
27
28
29
30
31
32
33
34
35
36
root@master1:~# kubectl config use-context mk8s
root@master1:~# kubectl get nodes
root@master1:~# kubectl cordon master1
root@master1:~# kubectl drain master1 --ignore-daemonsets --delete-emptydir-data --force

#考试的时候进行操作
ssh matser01
sudo -i

#查看kubeadm的版本信息
apt-get upgrade
apt-cache madison kubeadm
root@master1:~# apt-get install kubeadm=1.23.2-00

#验证版本升级是否成功
kubeadm version

#验证升级计划
kubeadm upgrade plan

#升级版本
kubeadm upgrade apply v1.23.2 --etcd-upgrade=false

#升级kubelet和kubectl
apt-get install kubelet=1.23.2-00
kubelet --version

apt-get install kubectl=1.23.2-00
kubectl version

#退回node节点
exit #退出root,退回到student@master01
exit #退出master01节点,回到student@node-1节点

#解除master1的cordon状态
kubectl uncordon master1

4、Etcd备份还原

image-20221106140826329

image-20221106141214965

在做题之前确认自己处在student@node-1

1
2
3
4
5
6
7
8
export ETCDCTL_API=3
mkdir /srv/data -p

#备份etcd数据库
etcdctl --endpoints=https://127.0.0.1:2379 --cacert=/etc/kubernetes/pki/etcd/ca.crt --cert=/etc/kubernetes/pki/etcd/server.crt --key=/etc/kubernetes/pki/etcd/server.key snapshot save /srv/data/etcd-snapshot.db

#还原数据库
etcdctl --endpoints=https://127.0.0.1:2379 --cacert=/etc/kubernetes/pki/etcd/ca.crt --cert=/etc/kubernetes/pki/etcd/server.crt --key=/etc/kubernetes/pki/etcd/server.key snapshot restore /srv/data/etcd-snapshot.db

5、networkpolicy网络策略

image-20221106143911209

1
2
3
4
5
6
7
8
9
10
11
12
13
14
15
16
17
18
19
20
21
22
23
24
25
26
27
28
29
30
31
32
33
34
#练习环境新建ns
kubectl create ns my-app
kubectl create ns echo

kubectl config use-context hk8s

#查看所有ns的标签label
kubectl get ns --show-labels

#将echo名称空间打上专有标签
kubectl label ns echo project=echo

#编辑network_policy.yaml配置文件(vim进去要调成:set paste模式,在官网上寻找模板)
root@master1:~# cat network_policy.yaml
apiVersion: networking.k8s.io/v1
kind: NetworkPolicy
metadata:
name: allow-port-from-namespce
namespace: my-app
spec:
podSelector:
matchLabels: {}
policyTypes:
- Ingress
ingress:
- from:
- namespaceSelector:
matchLabels:
project: echo
ports:
- protocol: TCP
port: 9000

kubectl apply -f network_policy.yaml

6、四层负载均衡-service

image-20221106151048445

1
2
3
4
5
6
7
8
9
10
11
12
13
14
15
16
17
18
19
20
21
22
23
24
25
26
27
#编辑名为front-end的deploy的配置文件,在.spec.template.spec.containers字段下添加
kubectl edit deploy front-end
ports:
- containerPort: 80
name: http

#检查修改成功与否
kubectl get deploy front-end -oyaml


#创建service
root@master1:~# cat deploy_service.yaml
apiVersion: v1
kind: Service
metadata:
name: front-end-svc
spec:
selector:
app: nginx
type: NodePort
ports:
- protocol: TCP
port: 80
targetPort: http
nodePort: 30080

kubectl apply -f deploy_service.yaml

7、七层负载均衡ingress

image-20221106154943941

1
2
3
4
5
6
7
8
9
10
11
12
13
14
15
16
17
18
19
20
21
kubectl config use-context k8s
root@master1:~# cat ingress.yaml
apiVersion: networking.k8s.io/v1
kind: Ingress
metadata:
name: pong
namespace: ing-internal
annotations:
nginx.ingress.kubernetes.io/rewrite-target: /
kubernetes.io/ingress.class: "nginx"
spec:
rules:
- http:
paths:
- path: /hello
pathType: Prefix
backend:
service:
name: hello
port:
number: 5678

8、deployment实现pod的扩容缩容

image-20221106221026309

1
kubectl scale --replicas=3 deloyment/loadbalancer

9、Pod指定节点调度

image-20221106221722426

1
2
3
4
5
6
7
8
9
10
11
12
13
14
15
16
17
root@master1:~# cat pod.yaml 
apiVersion: v1
kind: Pod
metadata:
name: nginx-kusc00401
spec:
nodeSelector:
disk: spinning
containers:
- name: nginx
image: nginx


#考试的时候不需要做
root@master1:~# kubectl label nodes node1 disk=spinning
root@master1:~# kubectl get pods | grep nginx
nginx-kusc00401 1/1 Running 0 3m48s

10、检查ready节点的数量

image-20221107204429498

1
2
3
4
5
6
7
8
9
root@master1:~# kubectl config use-context k8s
root@master1:~# kubectl get nodes | grep -w "Ready" | wc -l
2

root@master1:~# kubectl describe nodes master1 node1 | grep -i taint | grep -i "noschedule" | wc -l
1

#两者相减为2-1=1,然后将结果输入到文件当中
root@master1:/opt/KUSC00402# echo 1 > kusc00402.txt

11、一个pod封装多个容器

image-20221107210051040

1
2
3
4
5
6
7
8
9
10
11
12
13
14
15
root@master1:~# cat pod-kucc.yaml 
apiVersion: v1
kind: Pod
metadata:
name: kucc1
spec:
containers:
- name: nginx
image: nginx
- name: redis
image: redis
- name: memcached
image: memcached
- name: consul
image: consul

12、持久化存储卷PersistentVolume

image-20221107224439299

1
2
3
4
5
6
7
8
9
10
11
12
root@master1:~# cat pv.yaml 
apiVersion: v1
kind: PersistentVolume
metadata:
name: app-config
spec:
capacity:
storage: 2Gi
accessModes:
- ReadWriteMany
hostPath:
path: /srv/app-config

13、PersistentVolumeClaim

image-20221107225712346

1
2
3
4
5
6
7
8
9
10
11
12
13
14
15
16
17
18
19
20
21
22
23
24
25
26
27
28
29
30
31
32
33
root@master1:~# cat pvc.yaml 
apiVersion: v1
kind: PersistentVolumeClaim
metadata:
name: pv-volume
spec:
accessModes:
- ReadWriteOnce
resources:
requests:
storage: 10Mi
storageClassName: csi-hostpath-sc


root@master1:~# cat pvc-pod.yaml
apiVersion: v1
kind: Pod
metadata:
name: web-server
spec:
containers:
- name: nginx
image: nginx
volumeMounts:
- mountPath: "/usr/share/nginx/html"
name: pv-volume
volumes:
- name: pv-volume
persistentVolumeClaim:
claimName: pv-volume

#模拟环境无法保存,但是考试环境是可以保存的
root@master1:~# kubectl edit pvc pv-volume --record

14、查看pod日志

image-20221107231452513

1
root@master1:~# kubectl logs foobar | grep unable-access-website > /opt/KUTR00101/foobar

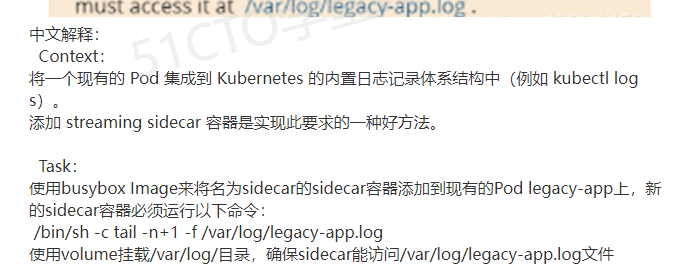
15、Sidecar代理

image-20221107232014300

1
2
3
4
5
6
7
8
9
10
11
12
13
14
15
16
17
18
19
20
21
22
23
24
25
26
27
28
29
30
31
32
33
34
35
36
37
38
39
40
41
42
43
44
45
46
47
48
49
50
51
52
53
54
55
56
57
58
59
60
61
62
63
64
65
66
67
#生成legacy-app pod(考试中是生成好的)
root@master1:~# cat legacy-app.yaml
apiVersion: v1
kind: Pod
metadata:
name: legacy-app
spec:
containers:
- name: count
image: busybox:1.28
args:
- /bin/sh
- -c
- >
i=0;
while true;
do
echo "$(date) INFO $i" >> /var/log/legacy-app.log;
i=$((i+1));
sleep 1;
done
volumeMounts:
- name: varlog
mountPath: /var/log
volumes:
- name: varlog
emptyDir: {}


kubectl get pods legacy-app -oyaml > sidecar.yaml


root@master1:~# cat sidecar.yaml
apiVersion: v1
kind: Pod
metadata:
name: legacy-app
namespace: default
spec:
containers:
- args:
- /bin/sh
- -c
- "i=0; while true; do\n echo \"$(date) INFO $i\" >> /var/log/legacy-app.log;\n
\ i=$((i+1));\n sleep 1;\ndone \n"
image: busybox:1.28
imagePullPolicy: IfNotPresent
name: count
volumeMounts:
- mountPath: /var/log
name: varlog
- args: [/bin/sh, -c, 'tail -n+1 -F /var/log/legacy-app.log']
image: busybox:1.28
imagePullPolicy: IfNotPresent
name: busybox
volumeMounts:
- mountPath: /var/log
name: varlog
volumes:
- emptyDir: {}
name: varlog


#验证是否成功
root@master1:~# kubectl logs legacy-app busybox | wc -l
148

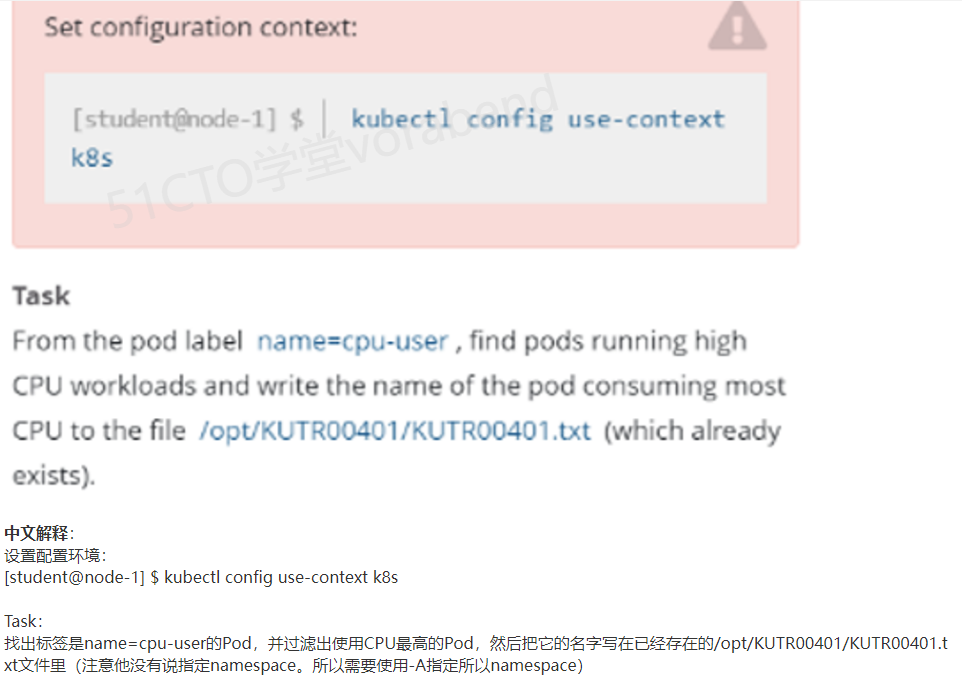
16、查看pod cpu的使用率

image-20221108220414893

1
2
3
#测试环境没有metrics组件,所以不能使用kubectl top pod
#需要手动安装metrics组件(addon.tar.gz、metrics-server-amd64-0-3-6.tar.gz)
kubectl top pods -l name=cpu-loader --sort-by=cpu -A

17、集群故障排查

image-20221108221940379

image-20221108222132938