GitLab_on_k8s

GitLab 是一个基于 Web 流行开源 Git 仓库管理工具,可以实现代码仓库的管理、代码浏览、问题跟踪、CI/CD 等功能。GitLab 还提供了自己的 CI/CD 工具,可以方便地进行持续集成和持续部署。对于中国地区我们还可以适合国产化的版本:极狐 GitLab,致力于实现一体化 DevOps 平台。

每个节点配置代理下载镜像

1
2
3
4
5
6
7
8
9
10
11
12
13
14
15
16
17
18
19
20
21
22
23
24
25
26
27
28
29
30
31
32
33
34
35
36
proxy="http://192.168.101.42:10811"
export proxy="http://192.168.101.42:10811"
export http_proxy=$proxy
export https_proxy=$proxy
export ftp_proxy=$proxy
export no_proxy="localhost, 127.0.0.0/8, ::1, 192.0.0.0/8, 10.0.0.0/8, 169.254.0.0/16"
cat > 1.txt <<END
docker.io/bitnami/postgres-exporter:0.12.0-debian-11-r86
docker.io/bitnami/postgresql:14.8.0
docker.io/bitnami/redis-exporter:1.43.0-debian-11-r4
docker.io/bitnami/redis:6.2.7-debian-11-r11
docker.io/minio/minio:RELEASE.2017-12-28T01-21-00Z
docker.io/minio/mc:RELEASE.2018-07-13T00-53-22Z
registry.gitlab.com/gitlab-org/build/cng/gitlab-sidekiq-ce:v17.0.1
registry.gitlab.com/gitlab-org/build/cng/gitlab-toolbox-ce:v17.0.1
registry.gitlab.com/gitlab-org/build/cng/gitlab-webservice-ce:v17.0.1
registry.gitlab.com/gitlab-org/build/cng/gitlab-workhorse-ce:v17.0.1
registry.jihulab.com/gitlab-cn/build/cng-images/certificates:v17.0.1
registry.jihulab.com/gitlab-cn/build/cng-images/gitaly:v17.0.1
registry.jihulab.com/gitlab-cn/build/cng-images/gitlab-base:v17.0.1
registry.jihulab.com/gitlab-cn/build/cng-images/gitlab-exporter:14.4.0
registry.jihulab.com/gitlab-cn/build/cng-images/gitlab-kas:v17.0.1
registry.jihulab.com/gitlab-cn/build/cng-images/gitlab-shell:v14.35.0
docker.io/bitnami/postgres-exporter:0.12.0-debian-11-r86
docker.io/bitnami/postgresql:14.8.0
docker.io/bitnami/redis-exporter:1.43.0-debian-11-r4
docker.io/bitnami/redis:6.2.7-debian-11-r11
registry.gitlab.com/gitlab-org/build/cng/gitlab-sidekiq-ce:v17.0.1
registry.gitlab.com/gitlab-org/build/cng/gitlab-webservice-ce:v17.0.1
registry.gitlab.com/gitlab-org/build/cng/gitlab-workhorse-ce:v17.0.1
registry.jihulab.com/gitlab-cn/build/cng-images/certificates:v17.0.1
END
for i in $(cat 1.txt)
do
ctr -n k8s.io images pull $i
done

1. 安装

GitLab 官方提供了 Helm 的方式在 Kubernetes 集群中来快速安装,所以我们可以直接使用 Helm 来安装 GitLab。

1.1 添加chart仓库

1
helm repo add jh-gitlab https://charts.gitlab.cn/

1.2 下载gitlab包

1
helm pull  --untar  jh-gitlab/gitlab

1.3 修改mini中的变量

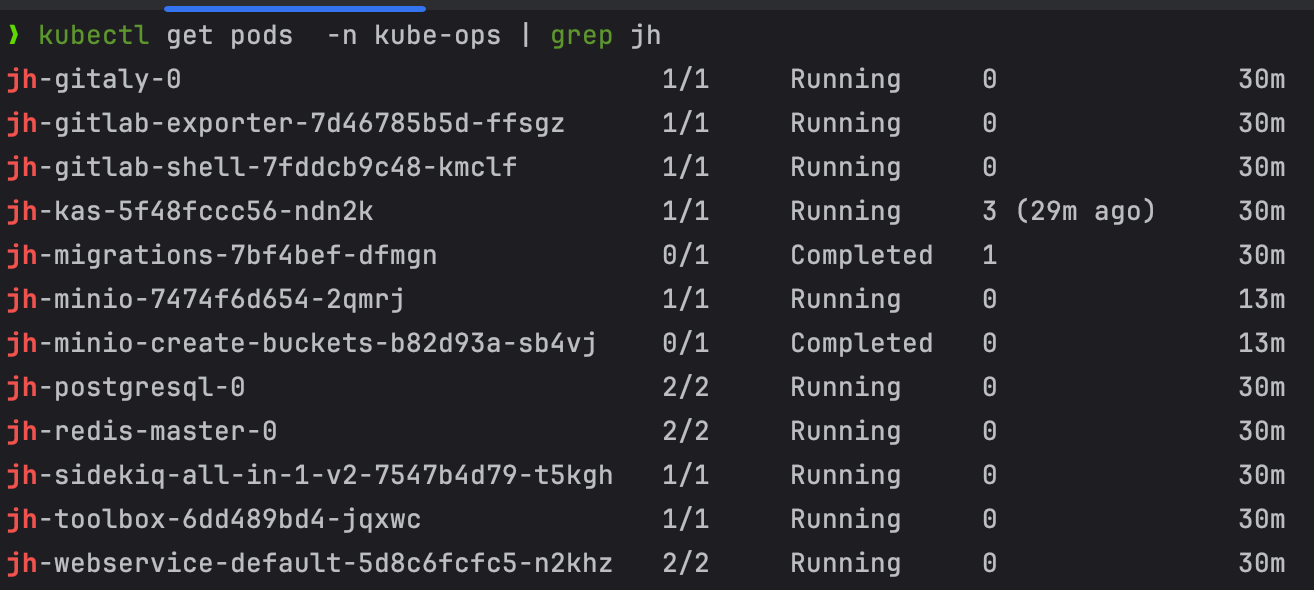
image-20240610143749456

1
2
3
image: "minio/minio" -------->>>>   image: "docker.io/minio/minio" 
image: minio/mc -------->>>> image: docker.io/minio/mc
storageClass: "-" -------->>>> storageClass: "nfs-client"

1.4 创建覆盖的变量文件

1
2
3
4
5
6
7
8
9
10
11
12
13
14
15
16
17
18
19
20
21
22
23
24
25
26
27
28
29
30
31
32
33
34
35
36
37
38
39
40
41
42
43
44
45
46
47
48
49
50
51
52
53
54
55
56
57
58
59
60
61
62
63
64
65
66
67
global:
time_zone: "Asia/Shanghai" # 设置gitlab时区
edition: ce # 设置gitlab版本 ce:社区版 ee:企业版

hosts:
domain: k8s.local # 配置根域名,用于gitlab生成(gitlab.k8s.local, kas.k8s.local, minio.k8s.local)
https: false # 是否启用https访问,关闭 https

ingress:
configureCertmanager: false
provider: nginx
class: nginx
enabled: true
tls:
enabled: false # 是否开启tls

minio:
enabled: true
# persistence:
# enabled: true
# storageClass: nfs-client # 无效只能在minio中手动进行修改
# size: 10Gi

# certmanager-issuer: # 证书生成所使用的邮箱
# email: [email protected]

certmanager:
installCRDs: false
nameOverride: certmanager
install: false
rbac:
create: true

nginx-ingress: &nginx-ingress
enabled: false

prometheus:
install: false

redis:
install: true
global:
storageClass: nfs-client

postgresql:
install: true
global:
storageClass: nfs-client

gitlab-runner:
install: false

gitlab:
gitaly:
persistence:
enabled: true
storageClass: nfs-client
size: 10Gi
kas:
minReplicas: 1
gitlab-shell:
minReplicas: 1
webservice:
minReplicas: 1

registry:
enabled: false

1.5 应用配置文件安装

1
helm upgrade --install jh ./gitlab --namespace kube-ops -f values.yaml

image-20240610144129302

2. 架构

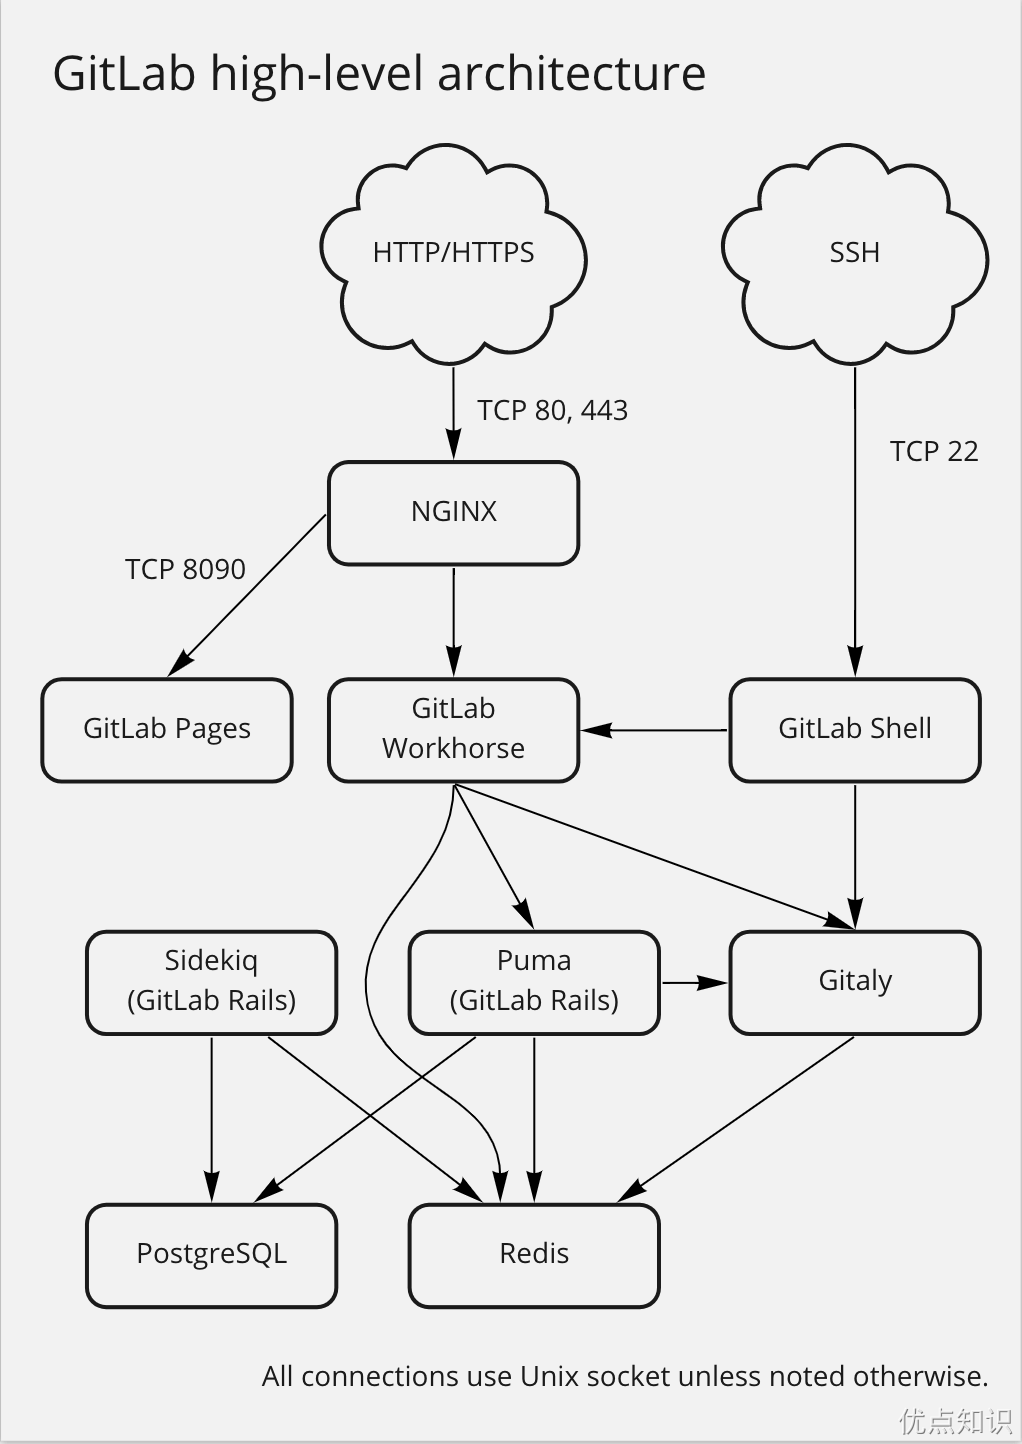
由于极狐 GitLab 包含非常多的组件,包括核心组件(诸如 Registry、Gitaly 等)、可选依赖组件(诸如 PostgreSQL、Redis 等)、可选附件组件(Prometheus、Grafana 等),整体的 Helm Values 文件比较复杂,可以根据自己的需求进行配置。
img

  • GitLab Workhorse:轻量级反向代理服务器,可以处理一些大的 HTTP 请求,处理 Git Push/Pull 请求,处理到 Rails 的连接会反向代理给后端的 Puma。
  • Puma:处理 Web 界面和 API 的请求。从 GitLab 13.0 开始,Puma 是默认的 Web 服务器。Puma 是一个 Ruby 应用程序服务器,用于运行核心 Rails 应用程序,该应用程序在 GitLab 中提供面向用户的功能。
  • GitLab Shell:用于 SSH 交互,而不是 HTTP。
  • Redis:缓存每个客户端的 sessions 和后台队列,负责分发任务。
  • Gitaly:后台服务,专门负责访问磁盘以高效处理 gitlab-shellgitlab-workhorse 的 git 操作,并缓存耗时操作。所有的 git 操作都通过 Gitaly 处理,并向 GitLab web 应用程序提供一个 API,以从 git 获取属性,并获取 blob 数据。
  • Sidekiq:后台核心服务,可以从 Redis 队列中提取作业并对其进行处理。后台作业允许 GitLab 通过将工作移至后台来提供更快的请求/响应周期。

当然还有一些其他的组件,比如 MinioKASPrometheus 等,这些都是可选的组件,可以根据自己的需求进行配置。其中 KAS 提供了 GitLab 代理服务器,管理 Kubernetes 的 GitLab 代理。

3. gitlab使用

3.1 访问与登录

使用gitlab.k8s.local 访问 GitLab ,要注意的是,通过 Ingress 的方式来暴露服务的,所以我们需要修改本地的 hosts 文件,将 gitlab.k8s.local 指向到 Ingress 的 IP 地址(ingress的地址为ingress控制器的地址,一般使用hostnetwork模式)

image-20240611161138868

初始用户名为 root,密码是以 Secret 的形式存放的:

1
2
3
4
5
kubectl -n kube-ops get secret | grep root
jh-gitlab-initial-root-password Opaque 1 2d2h

kubectl -n kube-ops get secret jh-gitlab-initial-root-password -o=jsonpath='{.data.password}' | base64 -d
7so3J9FbVgPnHpargyXf2zgvqRKl5n49hL2crqKSCBe0qYPwv9N26A58PZasEonW

前往 https://gitlab.k8s.local/-/profile/password/edit 页面修改密码,需要至少 8 位(比如 root@321),还可以修改用户名、语言等信息

3.2 创建仓库测试

创建一个实例仓库来测试下

image-20240611164627534

3.3 添加 SSH-KEY

添加本地用户的一个 SSH-KEY,这样我们就可以通过 SSH 来拉取或者推送代码了。SSH 公钥通常包含在 ~/.ssh/id_rsa.pub文件中,并以 ssh-rsa 开头。如果没有的话可以使用 ssh-keygen 命令来生成,id_rsa.pub 里面的内容就是我们需要的 SSH 公钥,然后添加到 Gitlab 中。

如果我们通过 SSH 方式去获取代码,这里需要注意我们服务的暴露方式,我们这里是通过 ingress-nginx 来暴露的服务,属于 7 层服务,而且我们这里本地是通过 LoadBalancer 去接入的 Ingress 流量,要通过 SSH 方式去获取代码,实际上是通过 gitlab-shell 组件来实现的,所以我们需要通过 ingress-nginx 去暴露 gitlab-shell 组件的 TCP 服务,这样我们才能通过 SSH 方式去获取代码。

可以看到 gitlab-shell 的端口是 22,所以我们需要在 ingress-nginx 中添加一个 TCP 的暴露规则,上面使用 Helm Chart 方式安装后会自动创建:

而且该配置文件是不能被你自己的 ingress-nginx 识别的,所以上面这个 ConfigMap 其实并没有生效,而且如果你使用的是 hostNetwork 模式则可能会和宿主机的 22 端口冲突,这里我们可以修改一下端口,比如修改为 2222,比如我们这里的 ingress-nginx 监听的 tcp 配置的 ConfigMap 名为 ingress-nginx-tcp,则修改为如下内容:

1
2
3
4
5
6
7
apiVersion: v1
kind: ConfigMap
metadata:
name: ingress-nginx-tcp
namespace: ingress-nginx
data:
"2222": "kube-ops/jh-gitlab-shell:22::"

然后在本地的 ~/.ssh/config 文件中添加如下配置:

1
2
3
4
5
Host jk.792588.xyz
HostName jk.792588.xyz
User root
Port 50022
IdentityFile ~/.ssh/id_rsa

现在我们就可以通过 SSH 方式去获取代码了

同样现在我们也可以提交代码到 GitLab 了

4. gitlab与jenkins结合使用

到这里我们完成了 GitLab 和 Jenkins 的安装,其实我们还可以将 GitLab 和 Jenkins 结合起来使用,这样当我们提交代码到 GitLab 时,就可以触发 Jenkins 的构建了。

我们可以通过 GitLab 的 Web 界面来触发 Jenkins 的构建,首先我们需要在 Jenkins 中创建一个 Pipeline 项目,然后在 GitLab 中配置 Webhook,这样当我们提交代码到 GitLab 时,就会触发 Jenkins 的构建。

首先需要在 Jenkins 中安装插件 Generic Webhook Trigger

image-20240611213507994

安装完成后,我们重新创建一个新的 Pipeline 任务,然后就可以选择这个触发器了。

image-20240611213526979

勾选 Generic Webhook Trigger 后, 相当于给 Jenkins 加了一个新的接口 [http://JENKINS_URL/generic-webhook-trigger/invoke。](http://jenkins_url/generic-webhook-trigger/invoke`。)

image-20240611213548049

在使用的时候我们需要把 JENKINS_URL 换成自己真实的 Jenkins 服务器地址,有端口就加上端口,是域名就写域名。比如我们这里就是 http://jenkins.k8s.local/generic-webhook-trigger/invoke

此外我们还可以为该触发器添加一个 Token,这样可以增加安全性,比如我们这里的 Token 是 youdianzhishi

image-20240611213610678

一共有 3 种方式可以使用这个 Token:

  • 在 URL 中使用 token 参数,比如 http://jenkins.k8s.local/generic-webhook-trigger/invoke?token=youdianzhishi
  • 在 HTTP Header 中使用 token 参数,比如 token: youdianzhishi
  • 通过 HTTP Header 的 Bearer Token 传递,比如 Authorization: Bearer youdianzhishi

此外还可以配置触发条件等等。然后定义流水线代码后保存即可。

这样 Jenkins 就开启 trigger 了,开启后,就可以实现其他系统通过一个指定的 URL 进行自动触发构建了。

就比如我们这里还是使用上面的 gitlab-demo 这个仓库。进入 GitLab 项目设置, 进入 Webhook 配置页面;

添加新的 webhook,配置要触发的 URL,即 Jenkins 触发器接口 URL:http://jenkins.k8s.local/generic-webhook-trigger/invoke?token=youdianzhishi。然后选择发生哪种 GitLab 事件后触发此 Webhook,例如:Push 提交代码、Tag 创建标签等等;

image-20240611213644582

添加后如果出现 Url is blocked: Requests to the local network are not allowed 这样的错误信息,则需要进入管理中心 -> 网络页面,路径 http://gitlab.k8s.local/admin/application_settings/network,z 找到出站请求,勾选允许来自 webhooks 和集成对本地网络的请求

image-20240611213736130

保存后重新再去添加 webhook,就可以成功了,然后我们可以通过测试按钮来测试下是否可以触发 Jenkins 的构建。

image-20240611213753189

正常情况下,我们可以看到 Jenkins 的构建已经触发了:

image-20240611213819332

在 GitLab Webhook 这边我们也可以查看到请求日志,如果出现了错误,可以根据日志来进行排查

到这里我们就完成了 GitLab 和 Jenkins 的集成,当我们提交代码到 GitLab 时,就可以触发 Jenkins 的构建了


本博客所有文章除特别声明外,均采用 CC BY-SA 4.0 协议 ,转载请注明出处!