高可用k8s集群部署(老庚NB版)
1. 环境准备
1
2
3
4
5
6
7
8
9
10
11
12
13
14
15
16
17
18
19
20
21
22
23
24
25
26
27
28
29
30
31
32
33
34
35
36
37
38
39
40
41
42
43
44
|
https://almalinux.org/
https://mirrors.almalinux.org/
https://wiki.almalinux.org/cloud/
hostnamectl set-hostname master1
nmcli con add con-name eth0-static ifname eth0 type ethernet ipv4.method manual ipv4.addresses 192.168.108.21/24 ipv4.gateway 192.168.108.2 ipv4.dns 114.114.114.114 connection.autoconnect yes
nmcli con up eth0-static;nmcli con delete eth0
hostnamectl set-hostname master2
nmcli con add con-name eth0-static ifname eth0 type ethernet ipv4.method manual ipv4.addresses 192.168.108.22/24 ipv4.gateway 192.168.108.2 ipv4.dns 114.114.114.114 connection.autoconnect yes
nmcli con up eth0-static;nmcli con delete eth0
hostnamectl set-hostname master3
nmcli con add con-name eth0-static ifname eth0 type ethernet ipv4.method manual ipv4.addresses 192.168.108.23/24 ipv4.gateway 192.168.108.2 ipv4.dns 114.114.114.114 connection.autoconnect yes
nmcli con up eth0-static;nmcli con delete eth0
hostnamectl set-hostname node1
nmcli con add con-name eth0-static ifname eth0 type ethernet ipv4.method manual ipv4.addresses 192.168.108.24/24 ipv4.gateway 192.168.108.2 ipv4.dns 114.114.114.114 connection.autoconnect yes
nmcli con up eth0-static;nmcli con delete eth0
hostnamectl set-hostname node2
nmcli con add con-name eth0-static ifname eth0 type ethernet ipv4.method manual ipv4.addresses 192.168.108.25/24 ipv4.gateway 192.168.108.2 ipv4.dns 114.114.114.114 connection.autoconnect yes
nmcli con up eth0-static;nmcli con delete eth0
hostnamectl set-hostname node3
nmcli con add con-name eth0-static ifname eth0 type ethernet ipv4.method manual ipv4.addresses 192.168.108.26/24 ipv4.gateway 192.168.108.2 ipv4.dns 114.114.114.114 connection.autoconnect yes
nmcli con up eth0-static;nmcli con delete eth0
|
1.1 节点配置hosts
1
2
3
4
5
6
7
8
9
10
| cat > /etc/hosts<<END
127.0.0.1 localhost localhost.localdomain localhost4 localhost4.localdomain4
::1 localhost localhost.localdomain localhost6 localhost6.localdomain6
192.168.108.21 master1
192.168.108.22 master2
192.168.108.23 master3
192.168.108.24 node1
192.168.108.25 node2
192.168.108.26 node3
END
|
1.2 控制节点上安装软件
1
2
3
4
5
6
7
8
9
10
11
12
13
14
15
16
17
18
19
20
21
22
23
24
25
26
27
28
29
30
31
32
33
34
35
36
37
38
39
40
41
42
43
44
45
46
47
48
49
| yum -y install git python3-pip sshpass
git clone -b release-2.23 https://github.com/kubernetes-sigs/kubespray.git
cd kubespray/
cat > inventory/sample/inventory.ini <<END
[all]
master1 ansible_host=192.168.108.21
master2 ansible_host=192.168.108.22
master3 ansible_host=192.168.108.23
node1 ansible_host=192.168.108.24
node2 ansible_host=192.168.108.25
node3 ansible_host=192.168.108.26
[kube-master]
master1
master2
master3
[etcd]
master1
master2
master3
[kube-node]
master1
master2
master3
node1
node2
node3
[calico-rr]
[k8s-cluster:children]
kube-master
kube-node
calico-rr
END
#
pip3 install -r requirements.txt -i https://mirrors.aliyun.com/pypi/simple/
#
sed -i \
"s|^# http_proxy:.*|http_proxy: http://192.168.101.42:10811|" \
inventory/sample/group_vars/all/all.yml
sed -i \
"s|^# https_proxy:.*|https_proxy: http://192.168.101.42:10811|" \inventory/sample/group_vars/all/all.yml
#
echo "ansible_ssh_pass: 1" >> inventory/sample/group_vars/all/all.yml
ssh-keygen -N '' -t rsa -f /root/.ssh/id_rsa
|
1.3 使用keepalived+haproxy配置高可用apiserver
1
2
3
4
5
6
7
8
9
10
11
12
13
14
15
16
17
18
19
20
21
22
23
24
25
26
27
28
29
30
31
32
33
34
35
36
37
38
39
40
41
42
43
44
45
46
47
48
49
50
51
52
53
54
55
56
57
58
59
60
61
62
63
64
65
66
67
68
69
70
71
72
73
74
75
76
77
78
79
80
81
82
83
84
85
86
87
88
89
90
| yum install -y keepalived
cp /etc/keepalived/keepalived.conf /etc/keepalived/keepalived.conf.bak
#
cat > /etc/keepalived/keepalived.conf<<END
! Configuration File for keepalived
global_defs {
router_id LVS_DEVEL
}
vrrp_instance VI_1 {
state MASTER
interface eth0
virtual_router_id 51
priority 100
advert_int 1
authentication {
auth_type PASS
auth_pass 1111
}
virtual_ipaddress {
192.168.108.100/24
}
}
END
#
systemctl enable keepalived --now
#
yum -y install haproxy
#
cat > /etc/haproxy/haproxy.cfg<<END
global
log 127.0.0.1 local2 notice
log 127.0.0.1 local0
##chroot /var/lib/haproxy
##pidfile /var/run/haproxy.pid
maxconn 4096
##user haproxy
##group haproxy
daemon
defaults
mode http
log global
option httplog
option dontlognull
retries 3
option redispatch
timeout connect 5000
timeout client 50000
timeout server 50000
frontend stats-front
bind *:8081
mode http
default_backend stats-back
frontend fe_k8s_6444
bind *:6444
mode tcp
timeout client 1h
log global
option tcplog
default_backend be_k8s_6443
acl is_websocket hdr(Upgrade) -i WebSocket
acl is_websocket hdr_beg(Host) -i ws
backend stats-back
mode http
balance roundrobin
stats uri /haproxy/stats
stats auth pxcstats:secret
backend be_k8s_6443
mode tcp
timeout queue 1h
timeout server 1h
timeout connect 1h
log global
balance roundrobin
server k8s_master1 192.168.108.21:6443
server k8s_master2 192.168.108.22:6443
server k8s_master3 192.168.108.23:6443
END
systemctl enable haproxy --now
|
1.4 重新修改配置文件进行证书的配置
1
2
| #
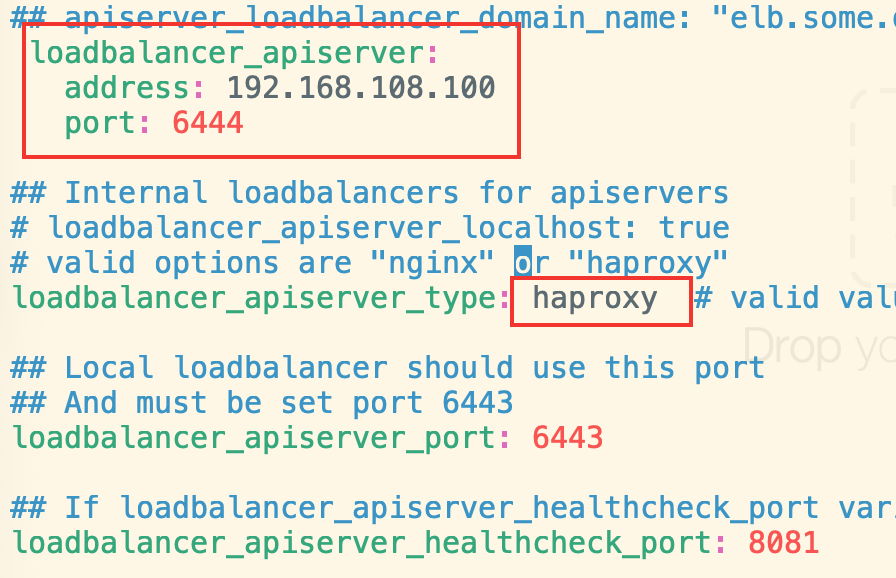
inventory/sample/group_vars/all/all.yml
|

1
2
| #
ansible-playbook -i inventory/sample/inventory.ini cluster.yml -u root -v --private-key=~/.ssh/id_rsa
|

